Feature Reference
A screen-by-screen reference to Veil, using the exact labels you will see in the product. Wherever the two regimes differ, both wordings are shown in a callout — everything else is identical in LGOIMA and OIA mode.
Dashboard & navigation
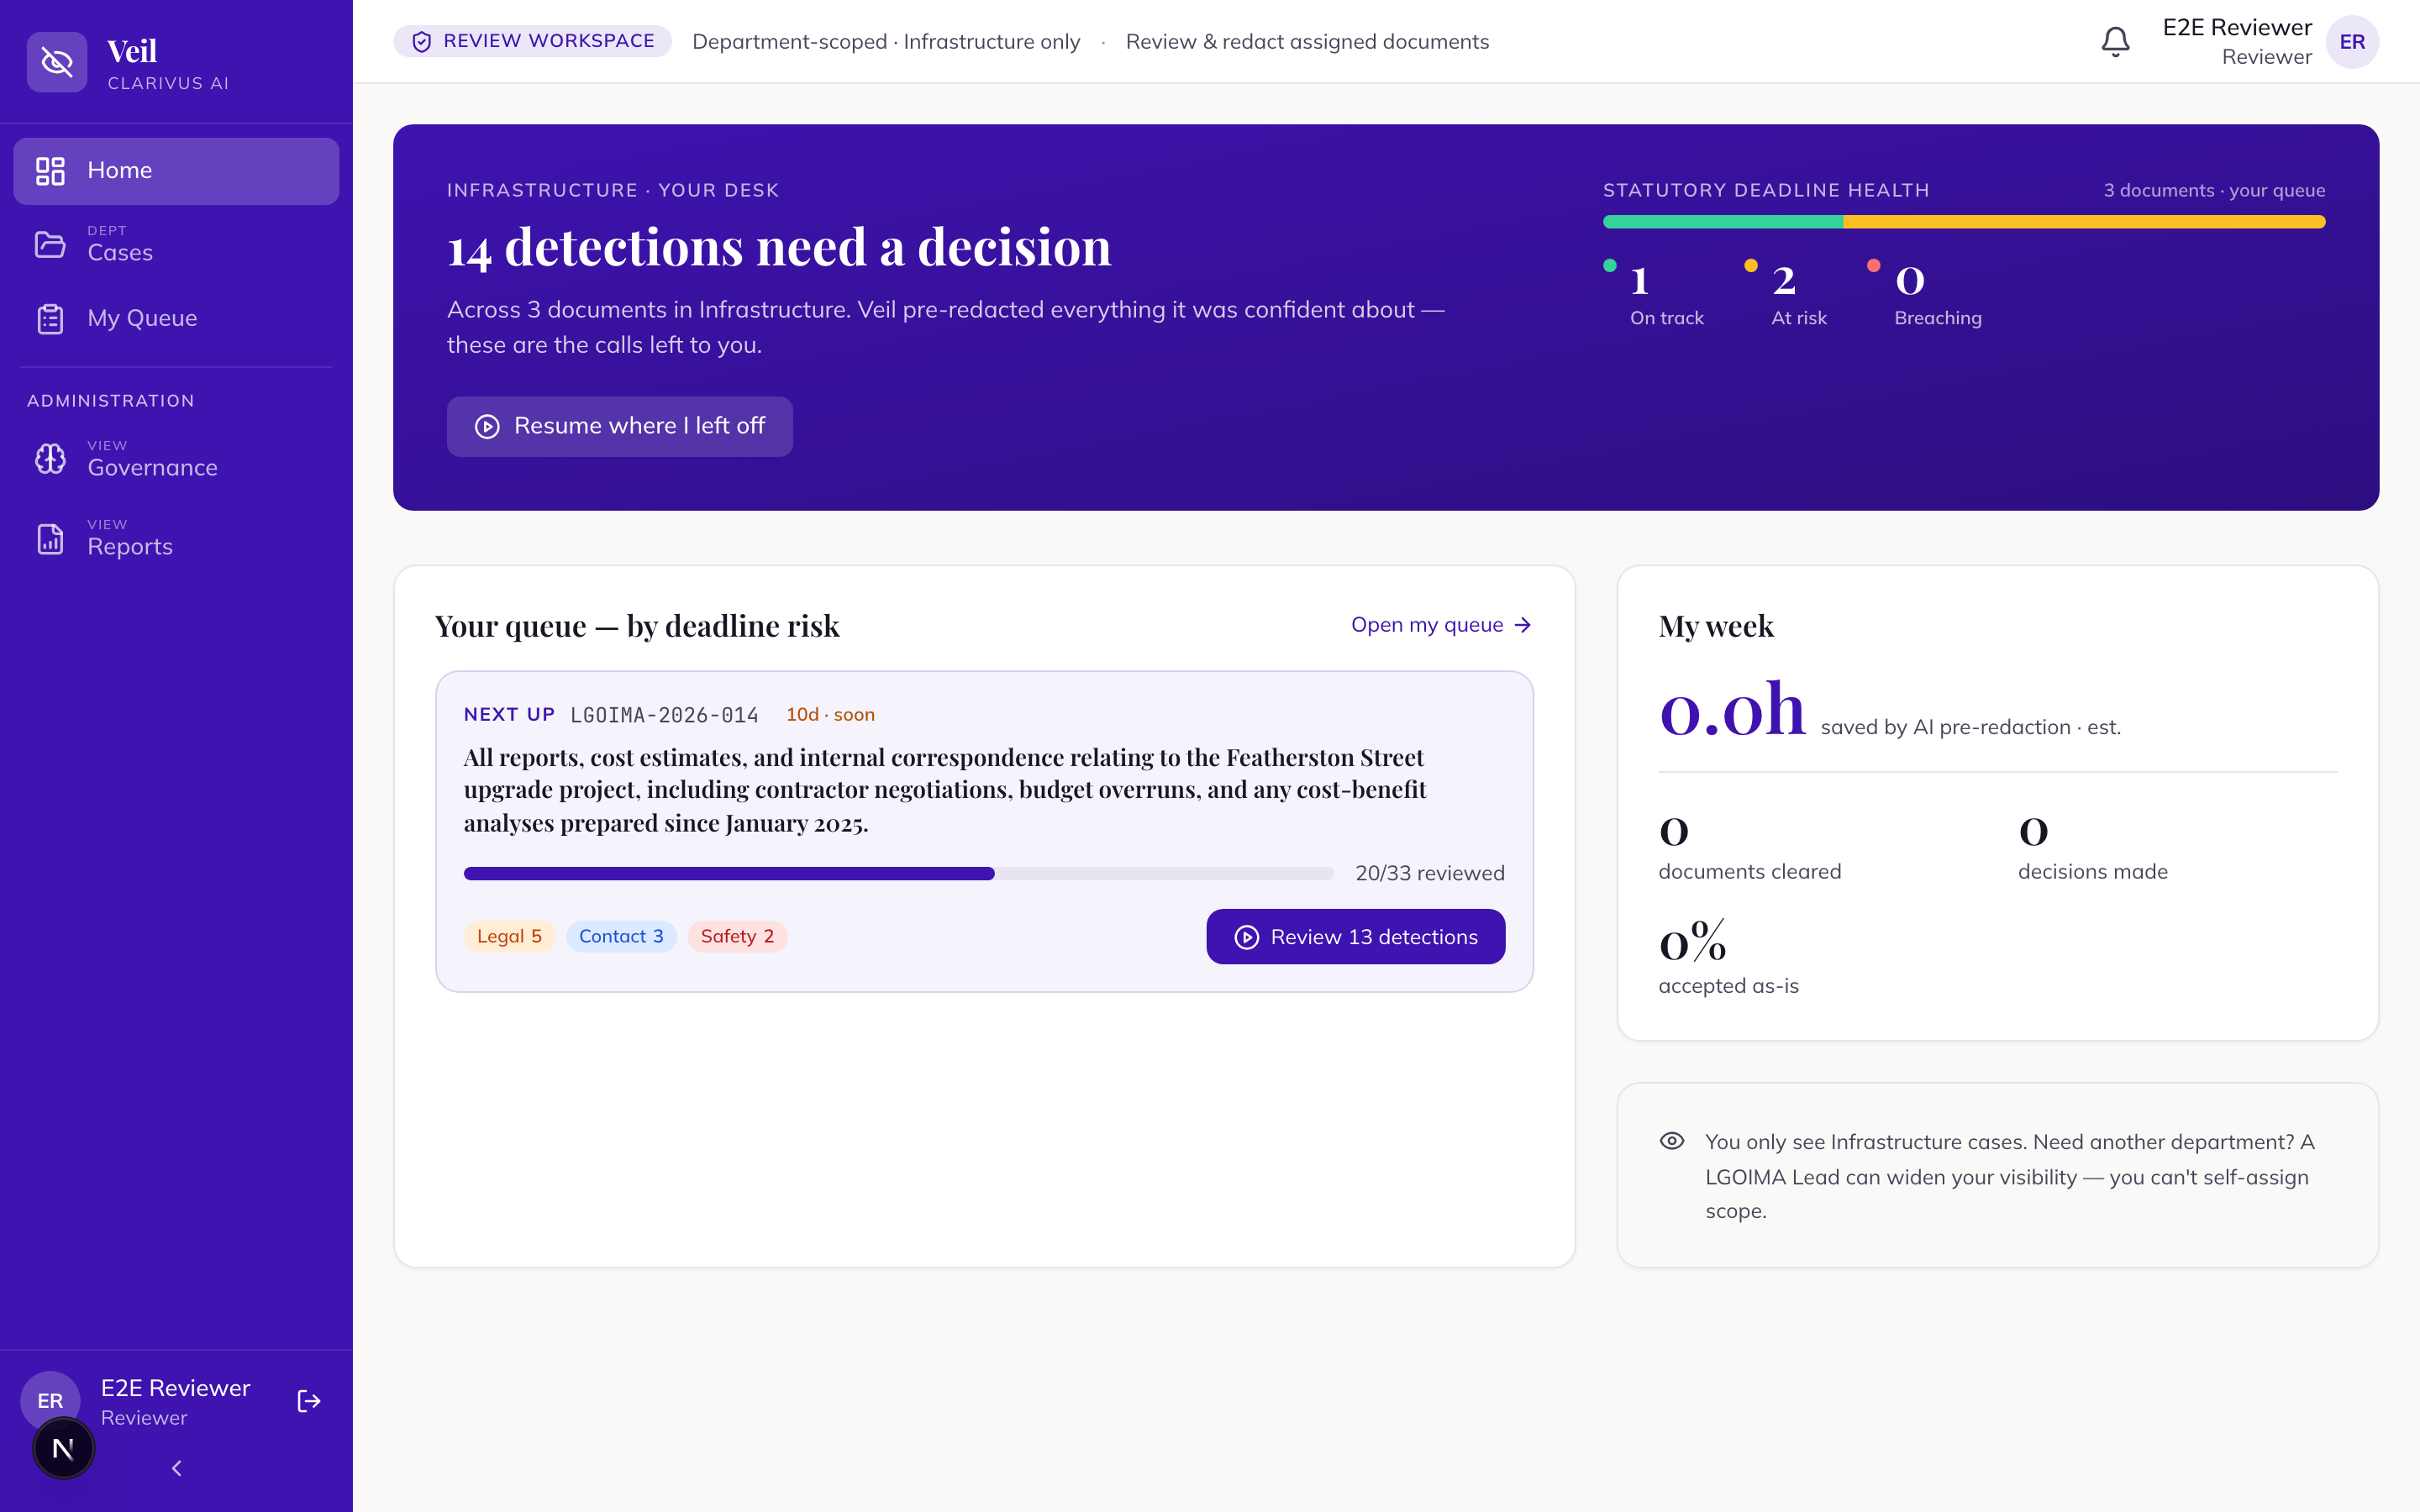
The left navigation rail carries the whole product. Depending on your role you may see: “Home”, “Cases”, “My Queue”, “New Case”, “Custom Rules”, “Governance”, “Reports”, and “Settings”. A Final Approver sees “Approvals” in place of “My Queue”.
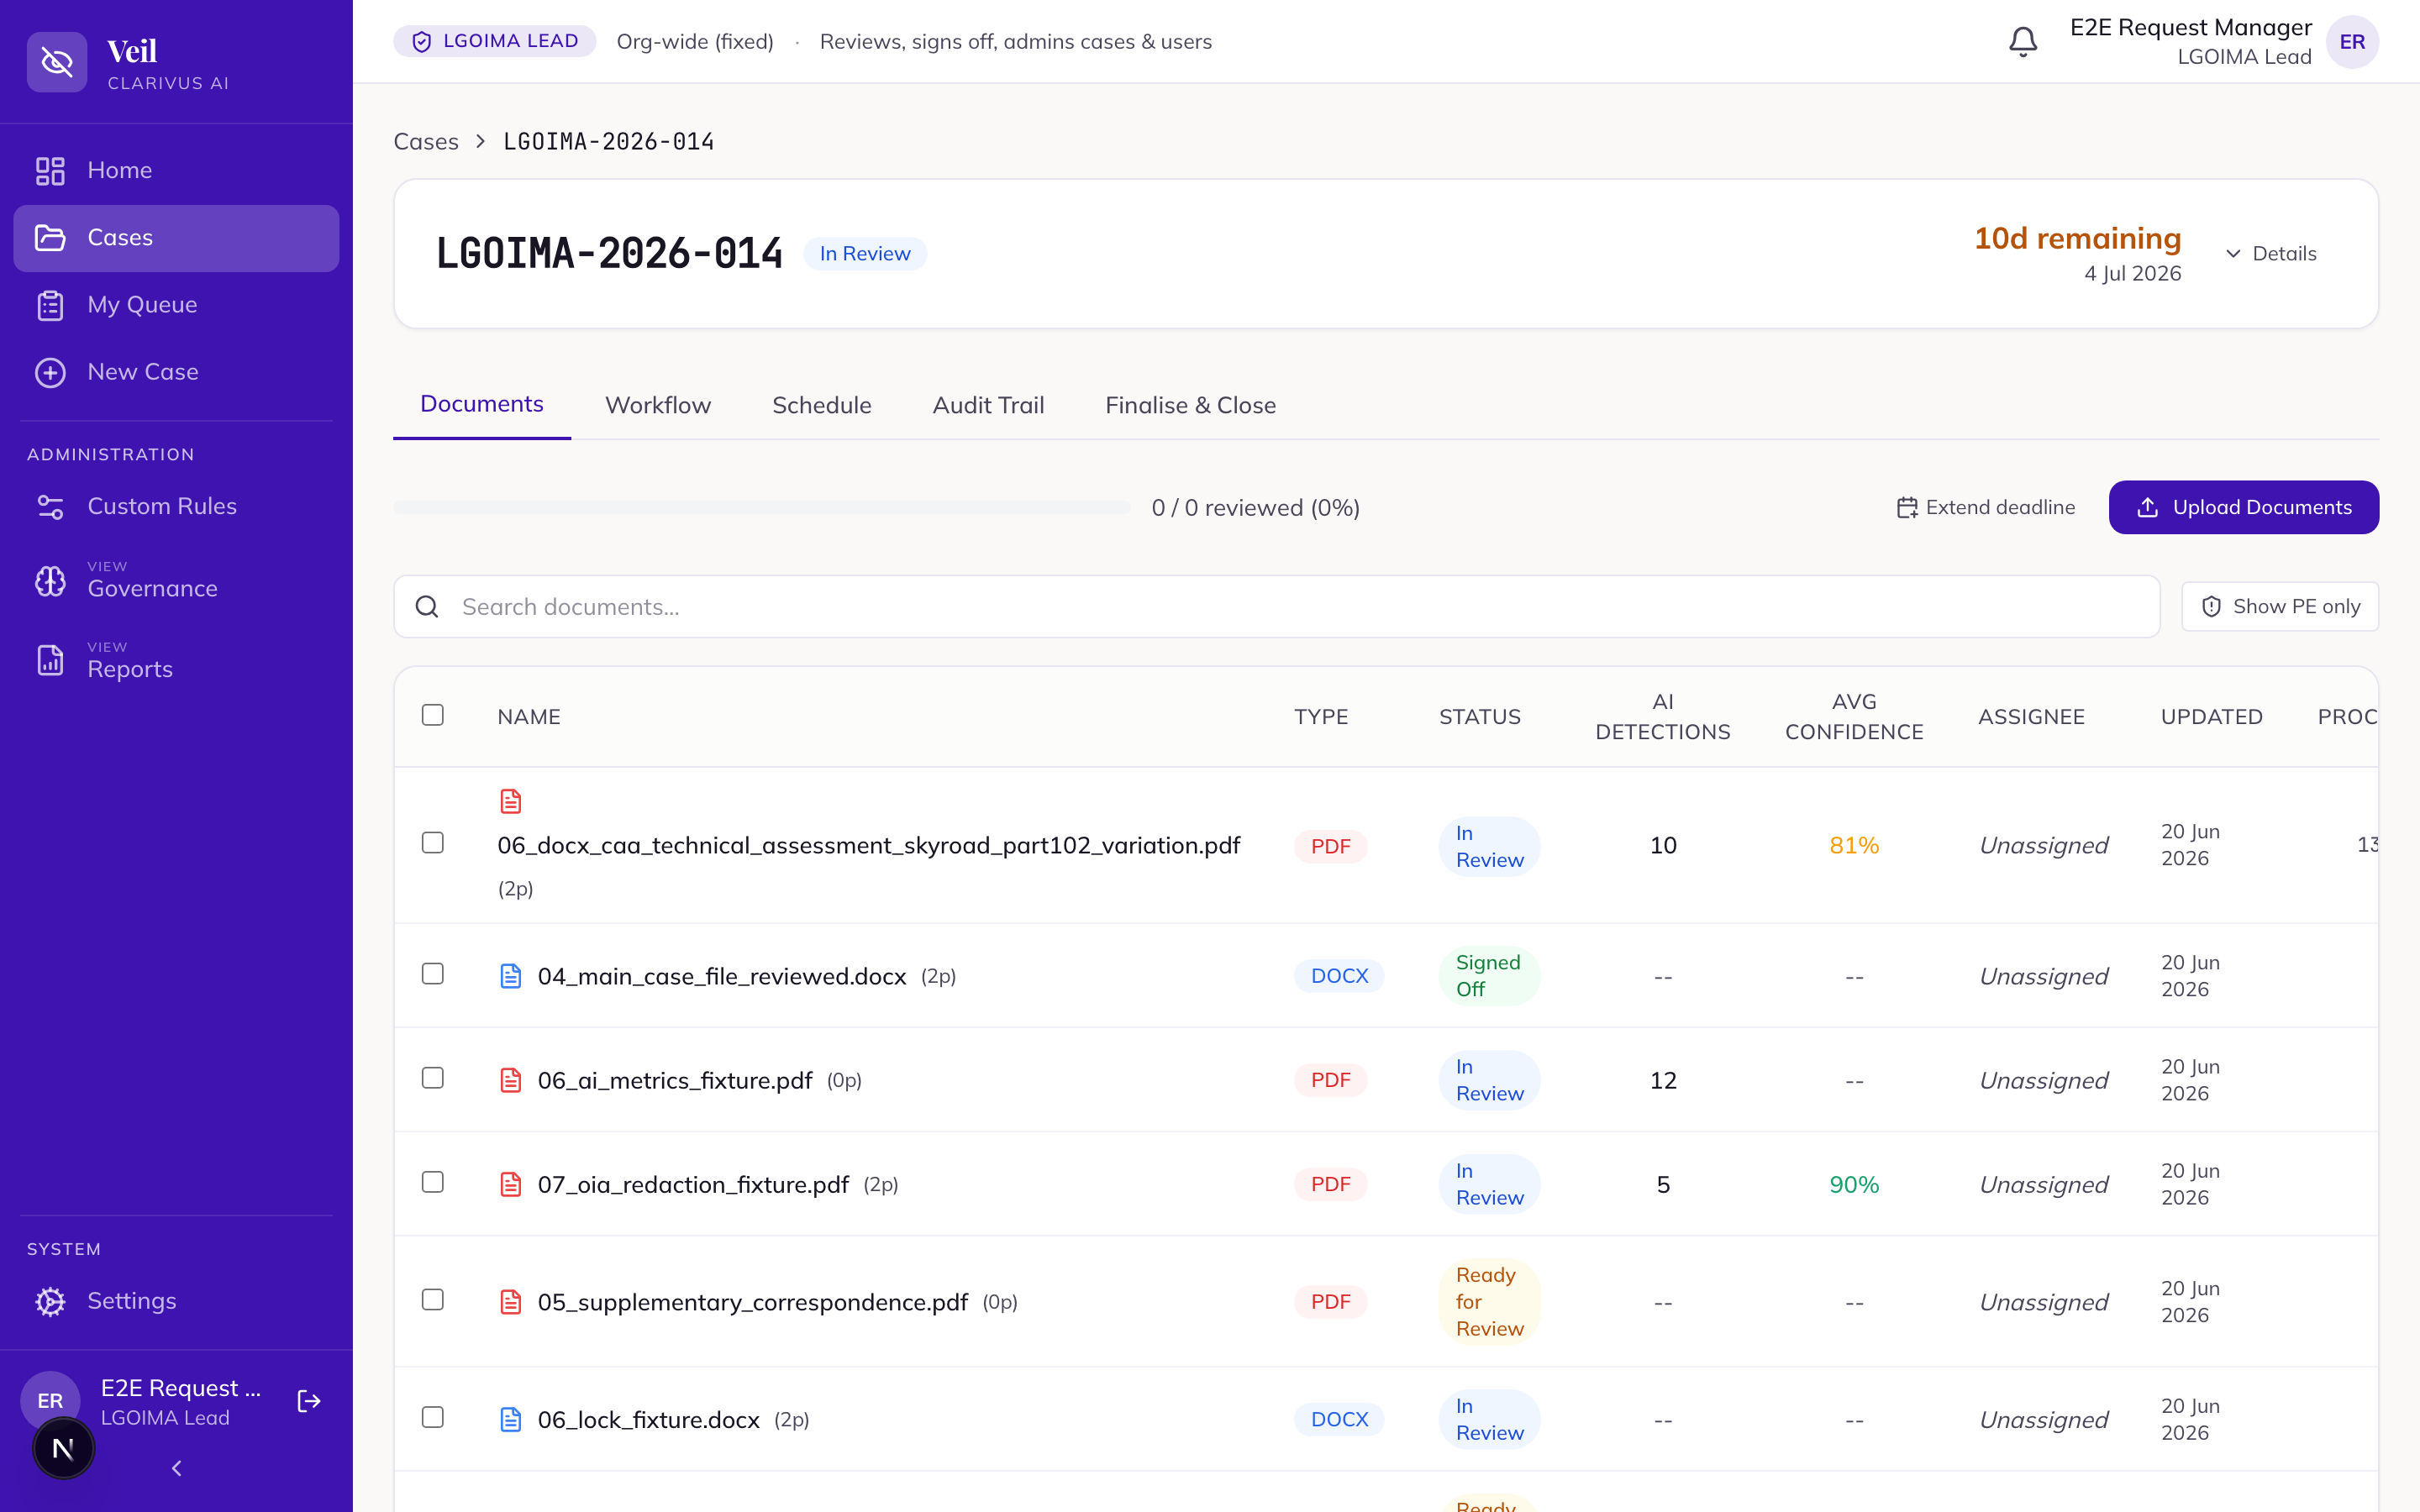
The dashboard (“Home”) shows a “Statutory deadline health” panel that classifies your cases as “On track”, “Urgent”, or “Overdue”, alongside your personal queue. “My Queue” is a per-case worklist, “Sorted by deadline risk”: one card per case, each showing its lifecycle stage, a stage summary of its documents, and how many are “awaiting your review” — open the case (or “Continue review”) to work them. Which cases appear is set by your visibility scope (department or organisation-wide), separately from your role.
Notifications. The bell in the top bar collects the events that need a person’s attention: documents uploaded or submitted, a document assigned or reassigned to you, a send-back, an export generated, a case attested or released, an edit lock taken over, a deadline turning amber or red, being rostered onto a stage, a collection confirmation being requested, and a case becoming ready to attest. Routine per-detection decisions, bulk operations, and settings changes are deliberately audit-only — the audit trail records everything; the bell only interrupts for hand-offs and risks.
“Your department isn’t set yet — ask an administrator or your OIA Lead to assign it so case work routes to you.” A new user whose department hasn’t been assigned sees this dismissible banner on every page. You cannot set your own department — an administrator (or your Lead, via the administrator) assigns it; until then, department-routed work won’t reach you.
Creating a request
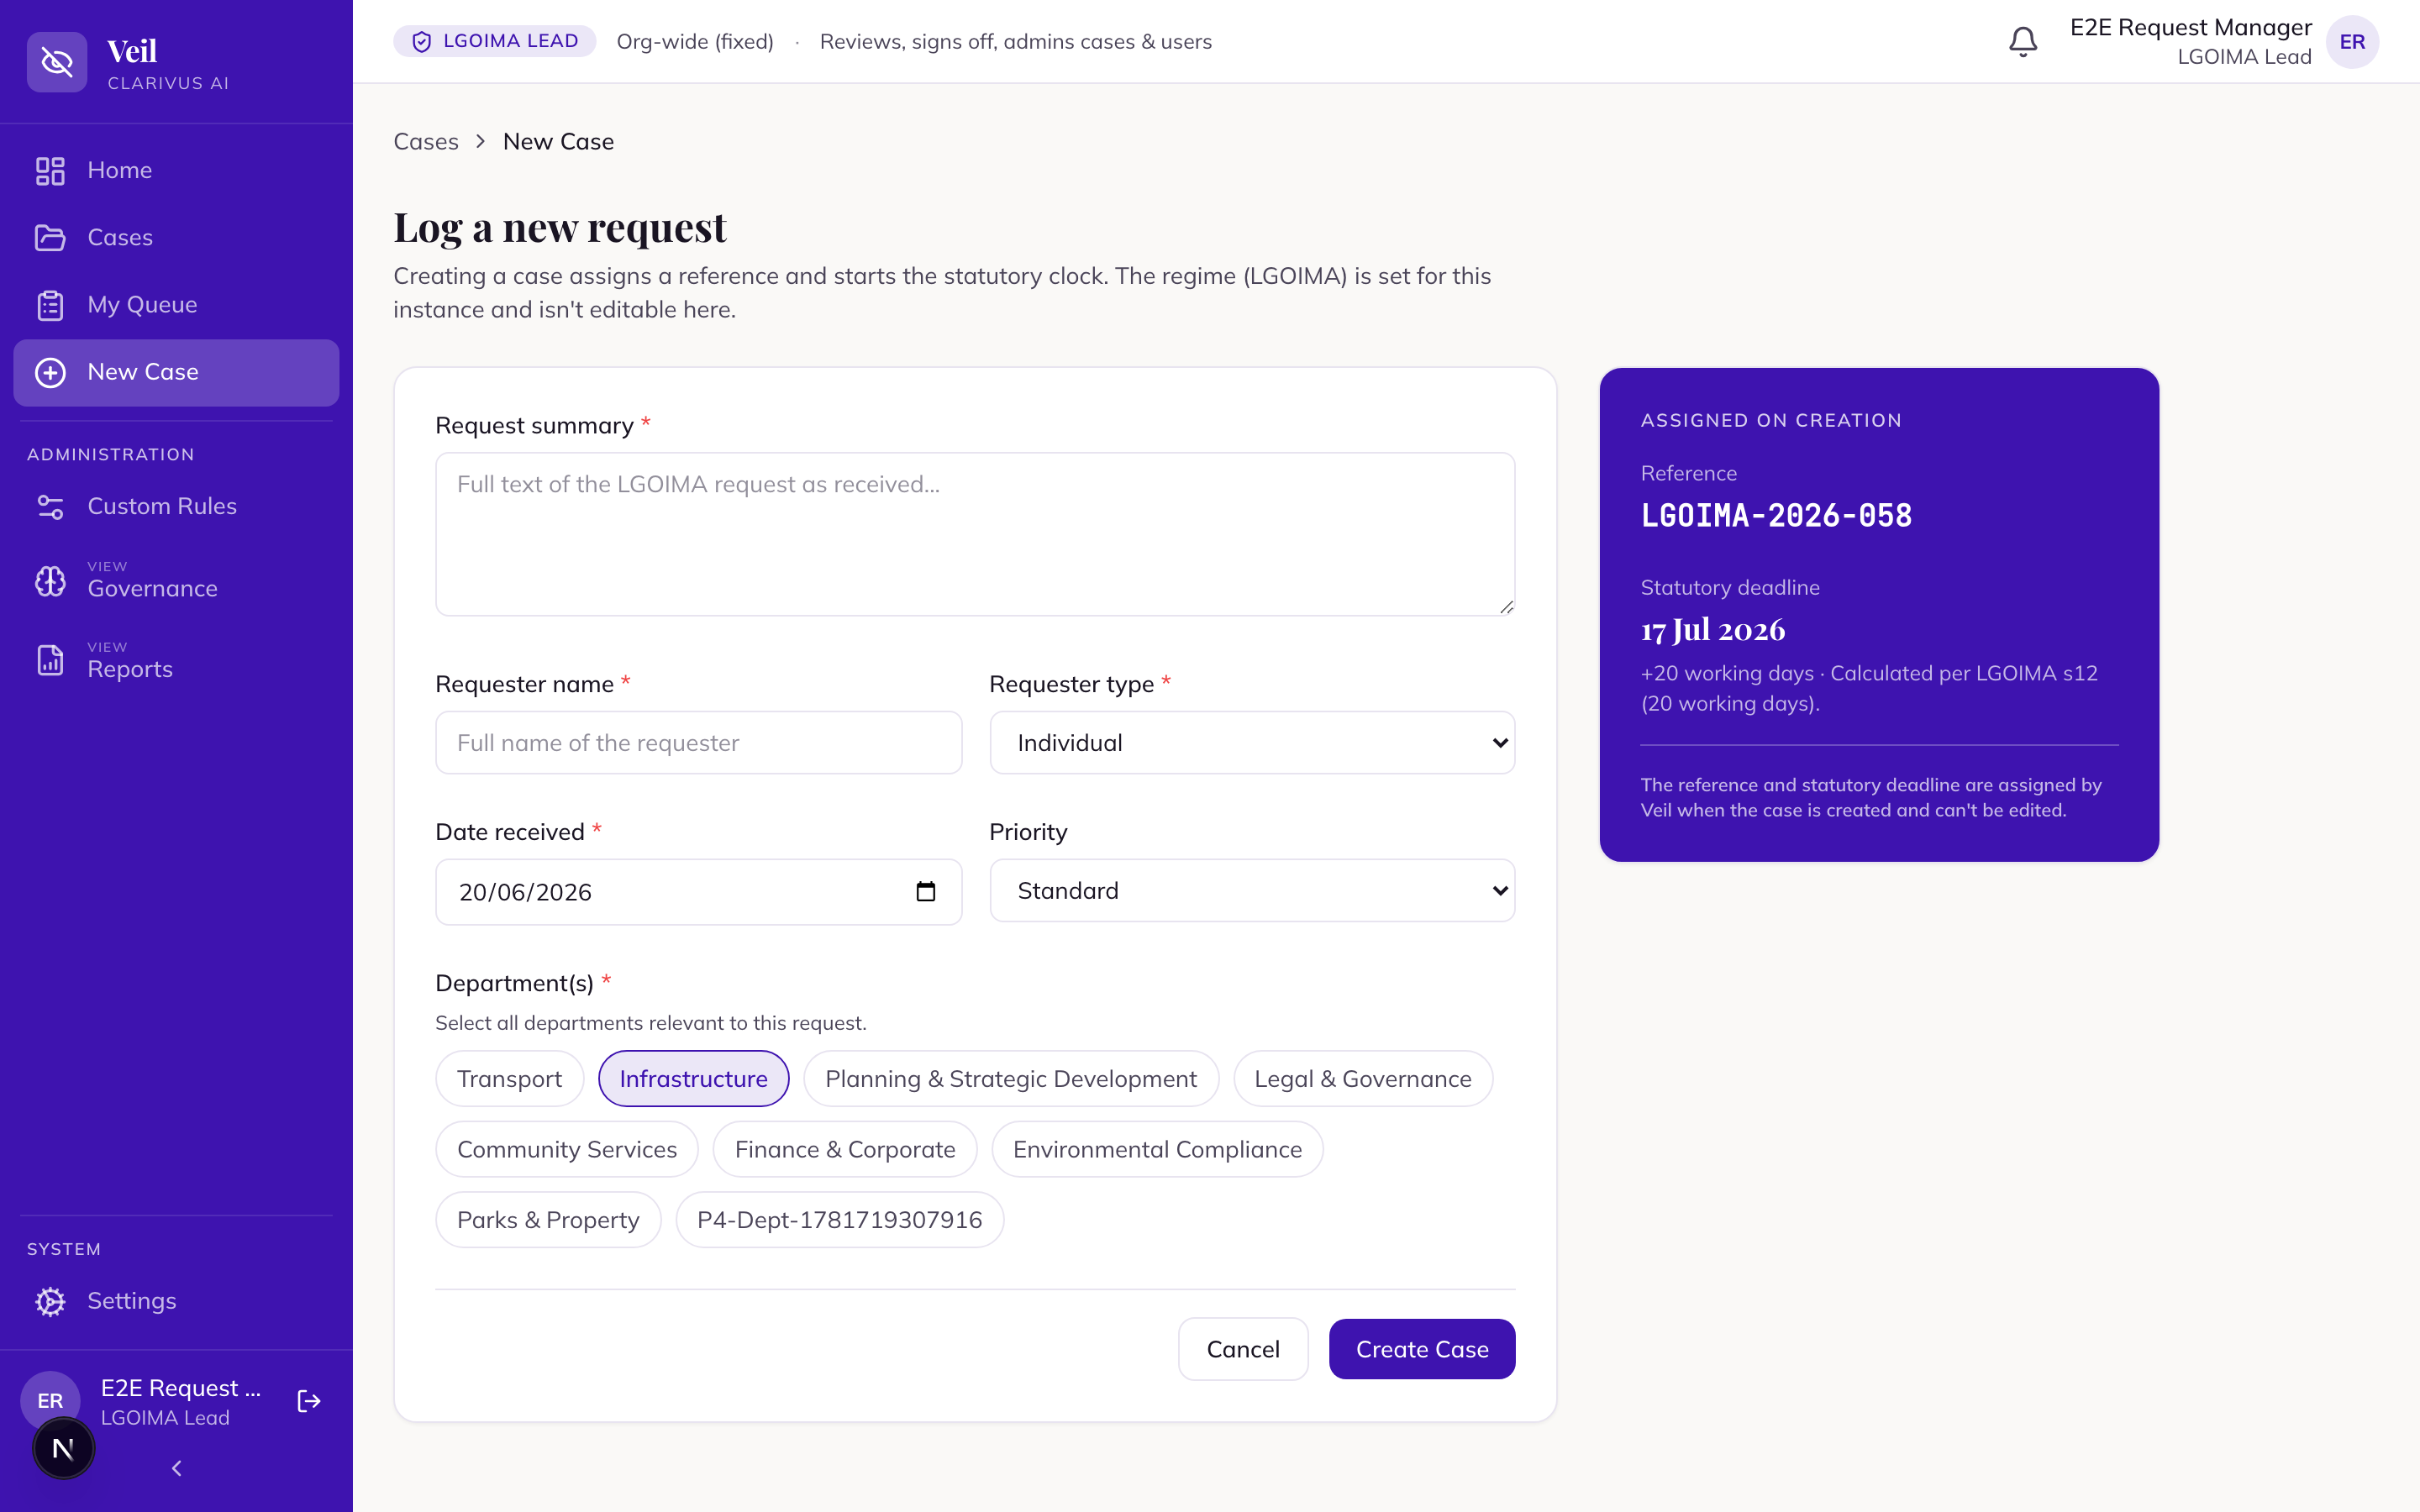
On “New Case” (“Log a new request”), the Lead enters the request and Veil does the rest. Fill in “Request summary”, “Requester name”, “Requester type”, “Date received”, “Priority”, and “Department(s)”, then press “Create Case”.
Veil assigns the “Reference” and the “Statutory deadline” automatically — neither can be edited on this form. The Lead can later formally extend the deadline with “Extend deadline” on the case’s Details page: alongside the read-only “Current deadline:”, enter a “New deadline” and a mandatory “Reason for extension”, which is written to the audit trail. Help text shows the ceiling as “Max extension: {N} working days”.
The Details page also lets the Lead correct “Date received” (“Save date received”): the statutory deadline is re-derived from the corrected date and the change is audited — “Changed date received and re-derived the statutory deadline”. There is no reason field, so it is for fixing intake data-entry errors only; a formally extended deadline is protected (the correction is refused if it would push the statutory date past the extension). Two more Details-page panels: “Notes” — “A single administrative note for this case. Editable even after the case is closed or released.” — and “Departments”, where departments can be added or removed (“A case must keep at least one department. A department can’t be removed while documents are scoped to it or reviewers are assigned to it.”). All Lead-only and audited.
Document ingestion & supported formats
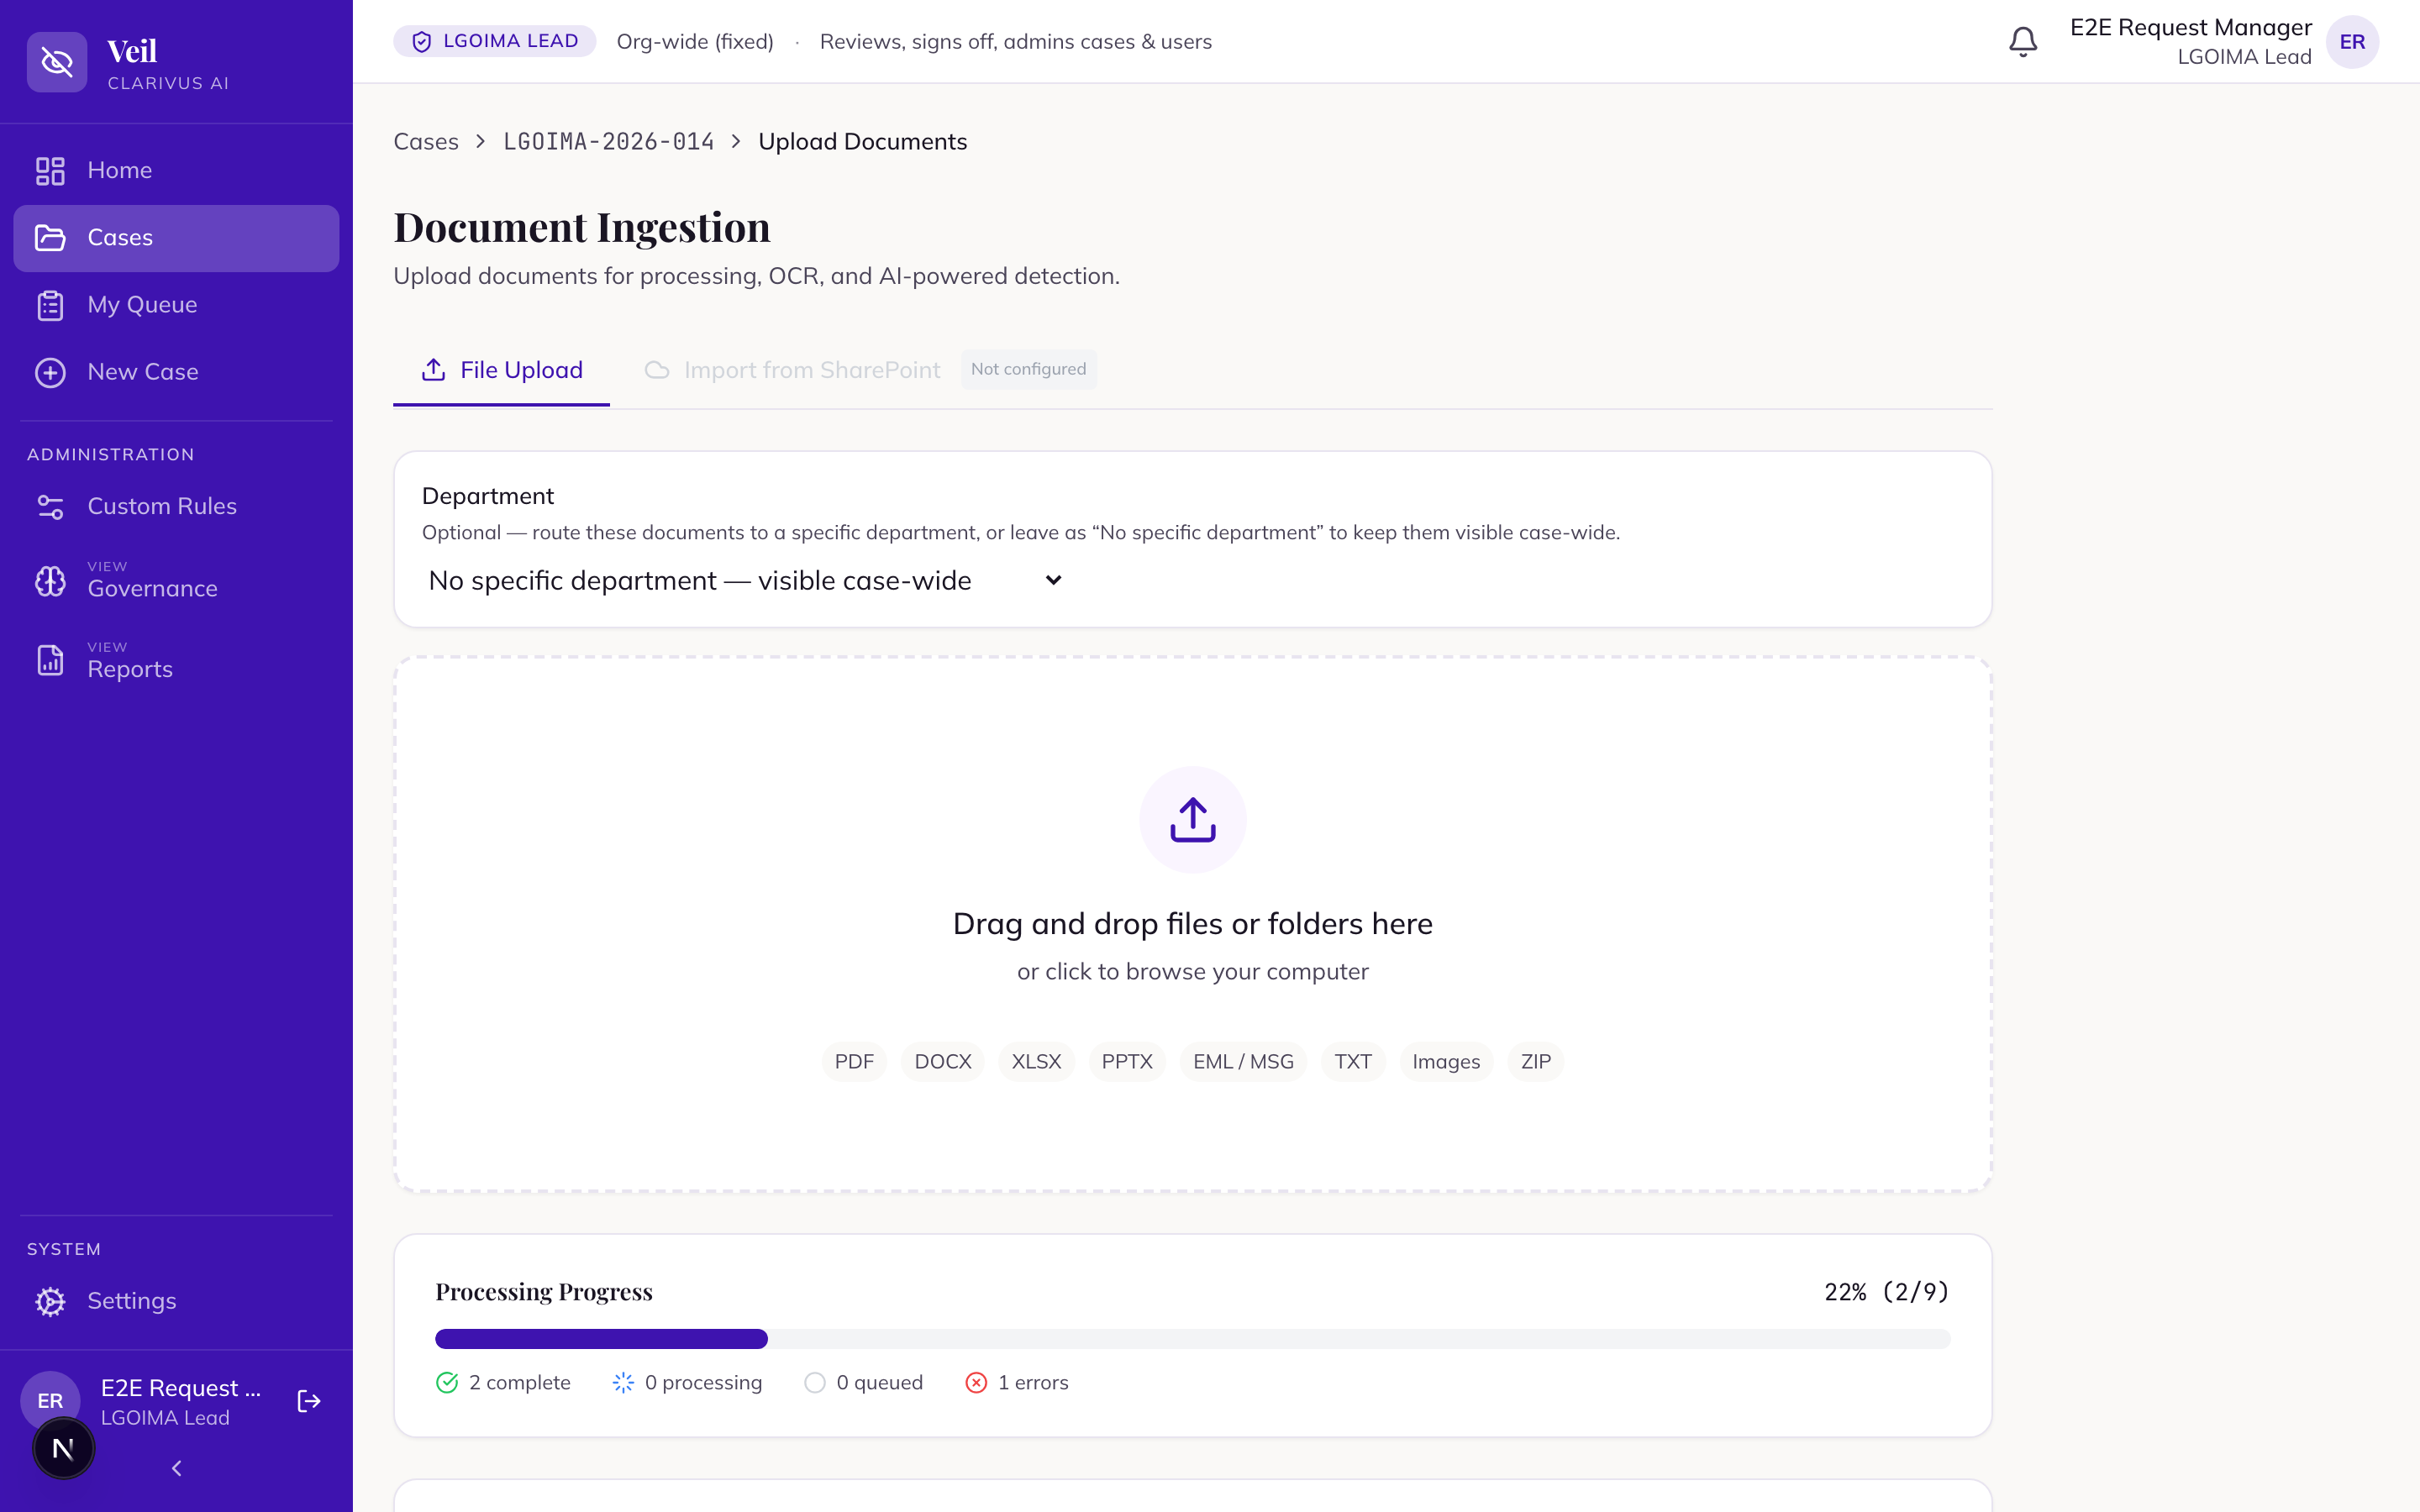
On “Document Ingestion”, use “Drag and drop files or folders here” or click to browse. Watch the “Processing Progress” and “Processing Queue” cards as each file runs the automated pipeline (the case shows the “Ingesting” status while documents process); when processing finishes, press “Continue to Review”. Re-uploading the same file shows a non-blocking amber “Duplicate” warning — the file is still added, so remove it yourself if it really is a duplicate.
If your visibility scope is organisation-wide and the case has departments, the upload panel offers an optional “Department” selector — “Optional — route these documents to a specific department, or leave as “No specific department” to keep them visible case-wide.” The default, “No specific department — visible case-wide”, never blocks an upload. Department-scoped uploaders don’t see the selector; their uploads are stamped to their own department automatically.
Veil accepts PDF, DOCX, XLSX, PPTX, email as EML / MSG (each email’s attachments become their own child documents), and TXT. .PST email archives and .ZIP folders are rejected — Veil does not expand them; export emails as EML or MSG, or unzip first, and upload the files individually. Standalone image files (PNG, JPG and similar) are also rejected at upload — scanned material must arrive as a PDF, which is read through OCR as normal.
Sensitive (New Zealand-only) processing
For material that must not leave the country, the upload panel carries a checkbox: “Sensitive — process in New Zealand only (no AI)”. Its own help text is the authoritative summary: “Documents uploaded with this on are processed entirely within New Zealand and are never sent to the AI service (Azure – Australia East). Detection uses pattern-matching, your custom rules and manual review only — automated recall is lower, so review these documents carefully. Supports born-digital files (Word, text-based PDFs, email); scanned documents can’t be processed in this mode.”
- What still runs: pattern detection of structured NZ identifiers, your agency’s custom rules, entity propagation, and manual review. What never runs: the AI layer — the document is never sent to the AI service, and the boundary is enforced in the processing pipeline, not just the screen.
- What you give up: the AI’s contextual judgement — names in prose, legal privilege, free-and-frank opinions, commercial sensitivity. Automated recall is genuinely lower; these documents rely on the reviewer’s eye and your custom rules, so review them line by line.
- Born-digital files only (Word, text-based PDFs, email). A scanned or image-only document can’t be read without OCR in this mode — it is accepted at upload but then goes to “Error” during processing (“Sensitive mode supports born-digital files only… Re-upload a born-digital version, or process it without the sensitive flag if AI extraction (Azure) is acceptable.”) rather than silently passing unread. Fail-closed, as everywhere else in Veil.
- Scope and visibility: the checkbox applies per upload batch and is stamped on each document. Anyone who can upload to the case can set it; who set it, and when, is recorded. Afterwards the document carries a “Sensitive — in-region, no AI” badge in the queue, the case document list, and the review screen, and the upload’s audit entry notes it — so the recall posture is always visible to the reviewer.
This is the operational counterpart to onshore hosting: hosting keeps the system in New Zealand, and Sensitive mode keeps an individual document’s processing in New Zealand as well. Use it for the small set of documents whose content cannot cross the boundary — and pair it with careful manual review, because that is what replaces the AI layer.
Finding & reusing past work
At intake, and from any case via Find Similar, Veil surfaces similar past requests — matched by meaning as well as words, across every case in the system — so you can spot a duplicate or reuse relevant work. From a matching case, Attach documents… copies documents into yours with a fresh review state (copies, never links; the source is untouched). Where an uploaded or attached file is byte-identical to one processed before, Veil imports the earlier analysis instead of re-running the AI — but every imported detection arrives pending: nothing imported is ever pre-decided.
Full walkthrough: Find & reuse past work.
Document review
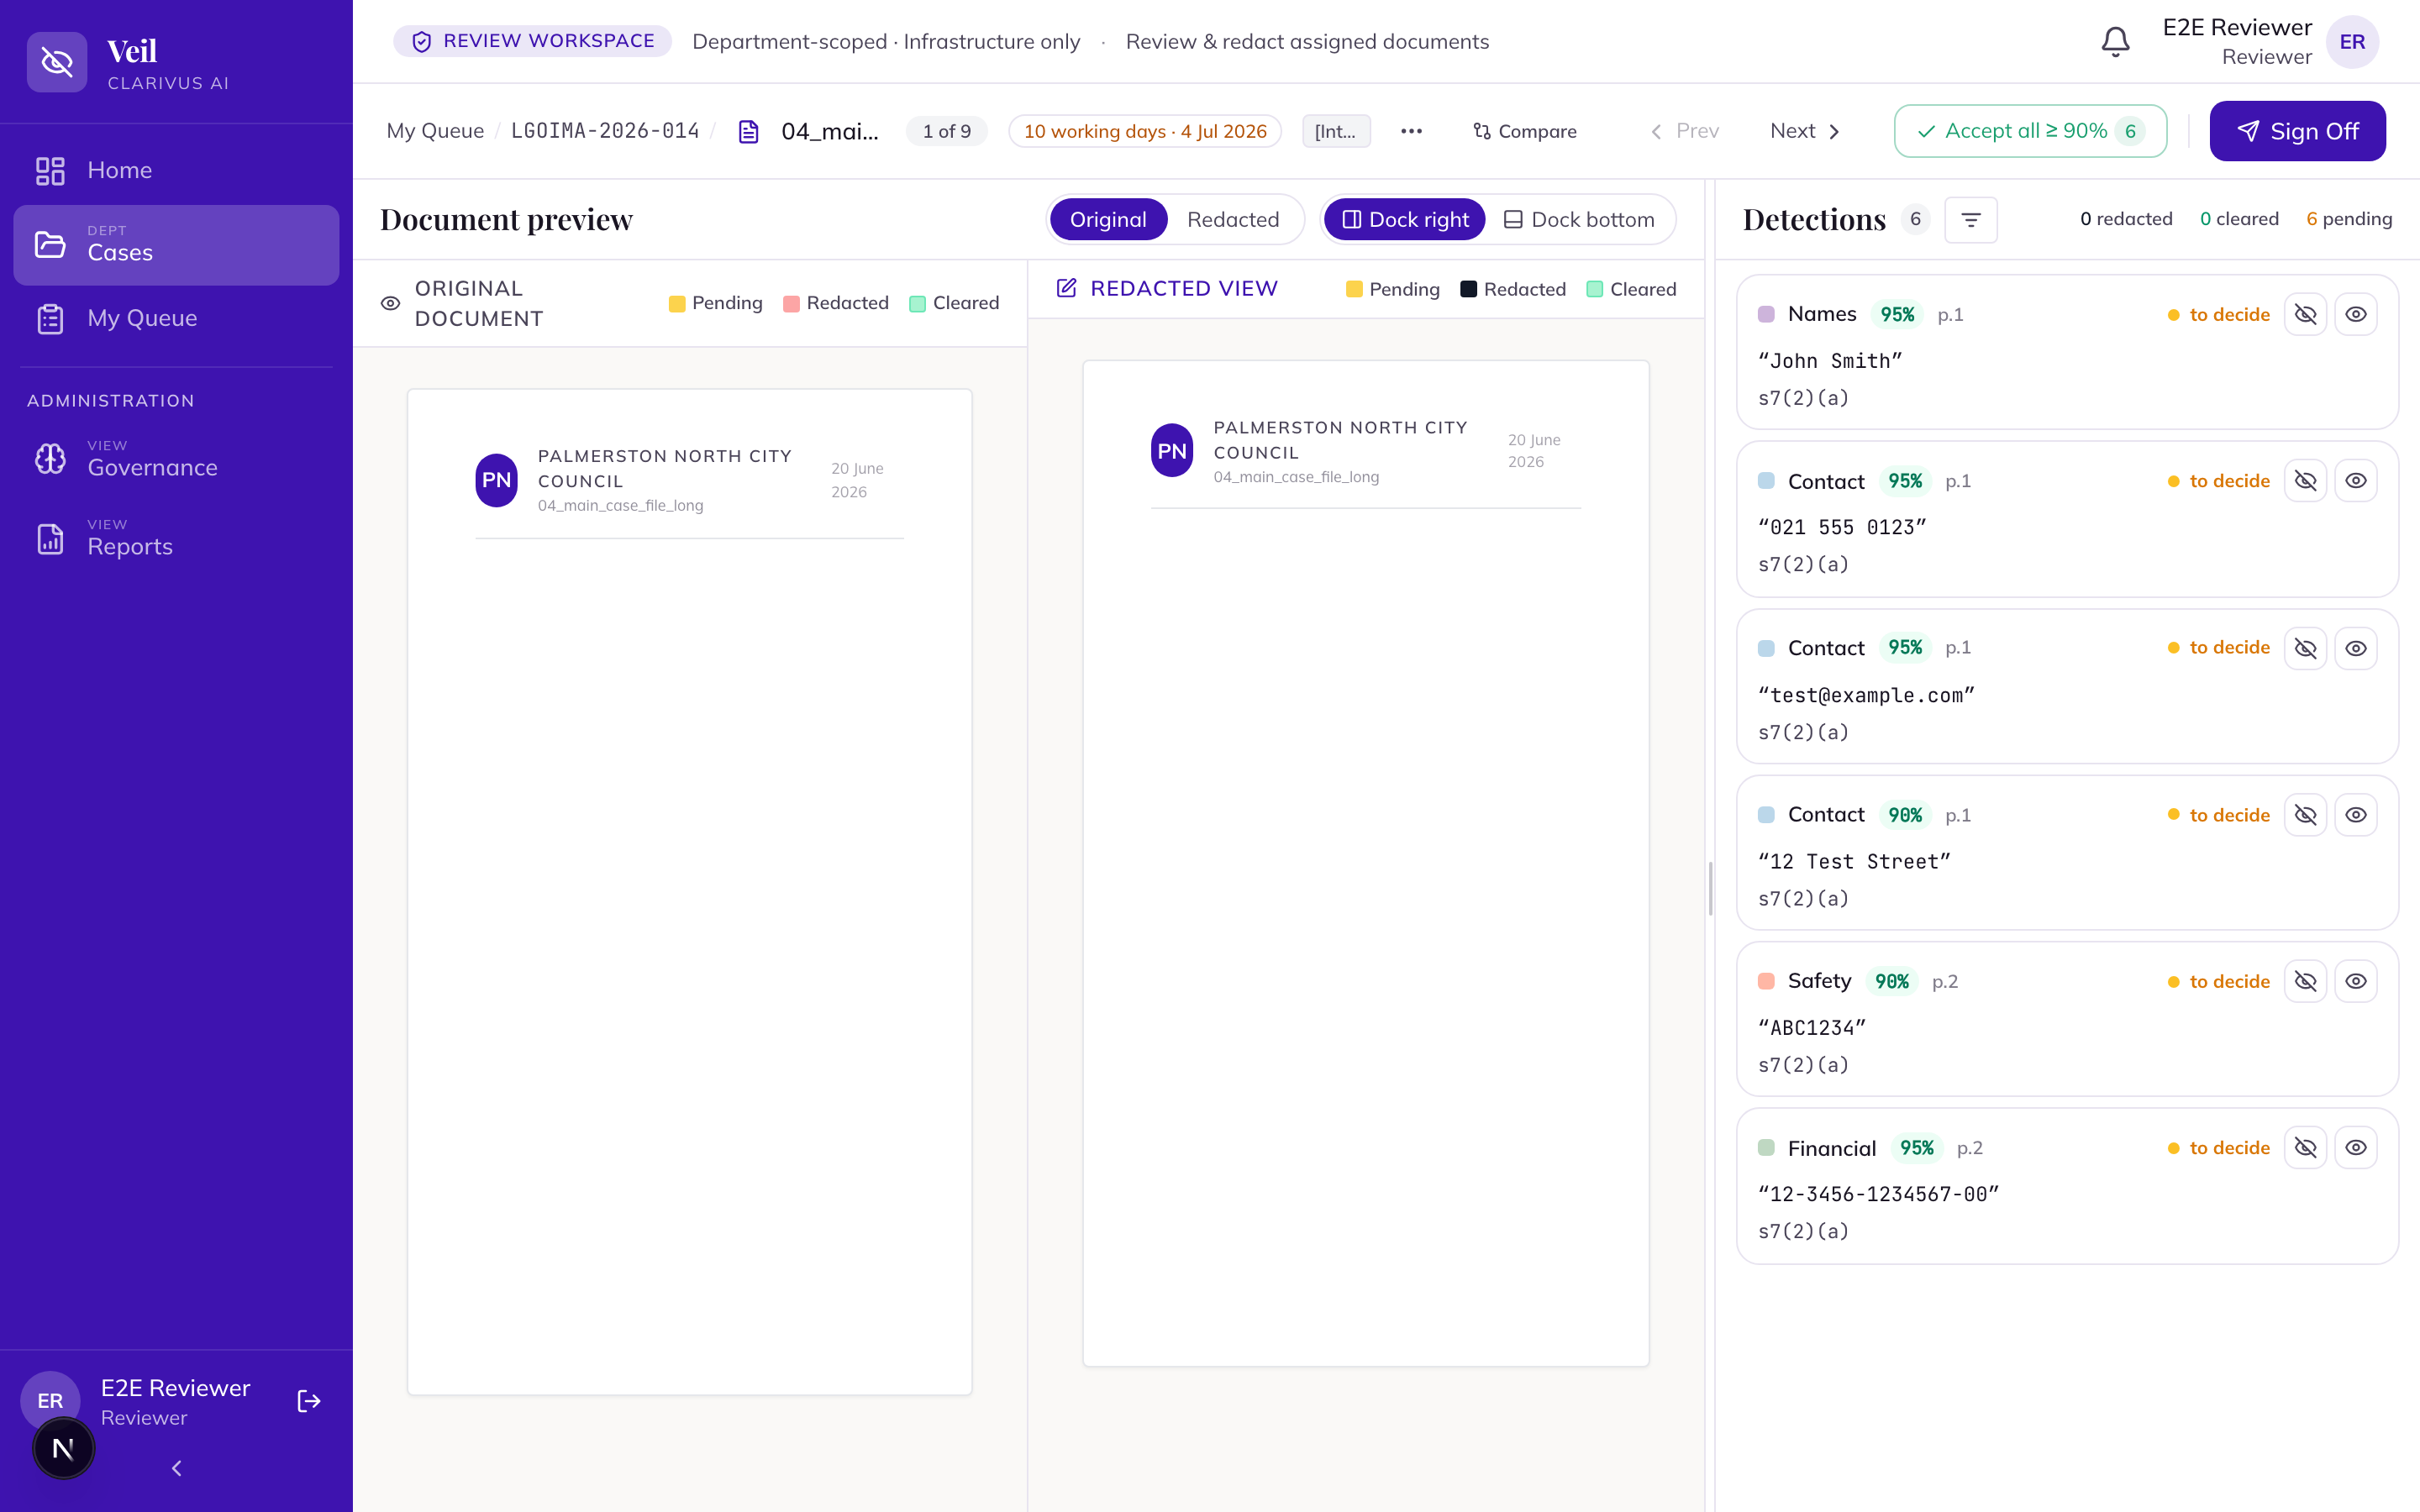
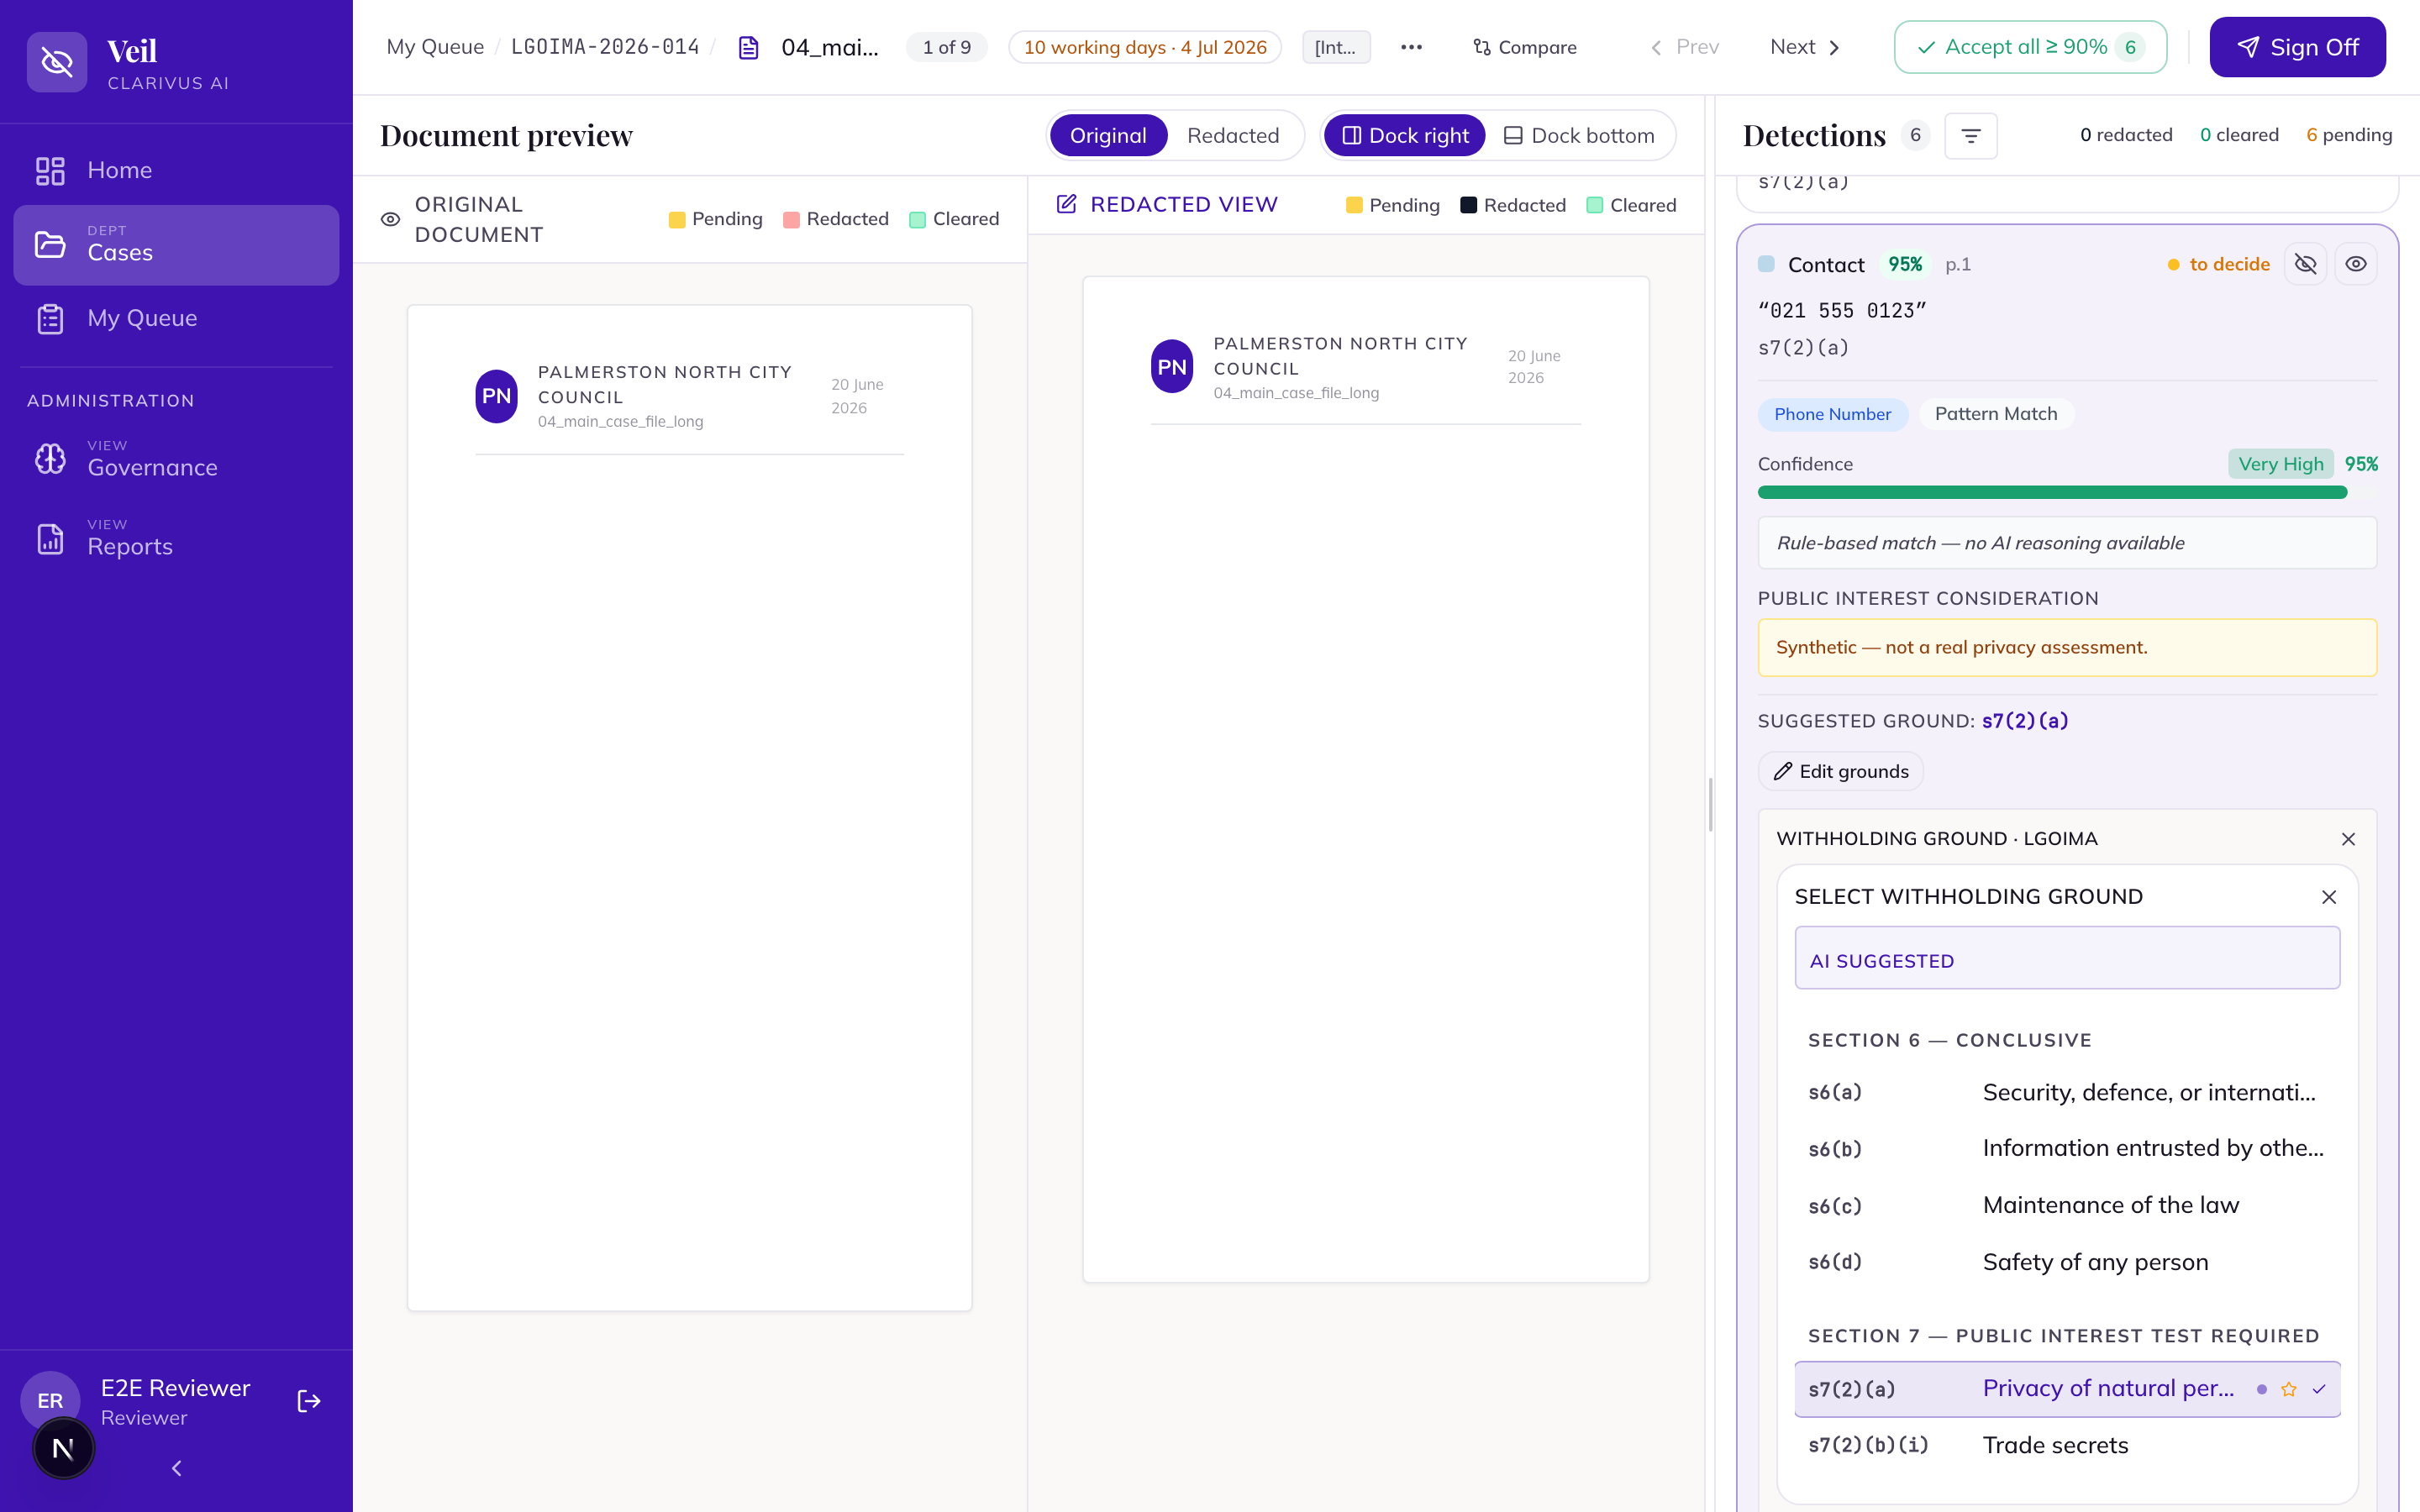
The Document Review screen is a split view: the document on the left, the “Detections” panel on the right, with a “Filter detections by category” control offering “All Detections”, “Personal”, “Commercial”, and “Other”. For each detection you choose “Redact” (withhold) or “Don’t redact — keep visible”; the card shows its state as “to decide”, “redacted”, or “kept visible”. Card details include “Reasoning”, “AI Explanation”, “Public Interest Consideration”, “Suggested ground”, and “Change History”. Nothing is ever pre-redacted — every detection starts pending and a person decides each one.
Toggle the preview between “Original” and “Redacted” to see the effect of your decisions. You can add a manual detection by selecting text in the document, and use “Change type” or “Edit grounds” on any card. Every redacted detection needs a withholding ground before the case can be exported: use “Edit grounds” → “Select Withholding Ground” — grounds are grouped by section of the Act, and an optional reviewer note appears in the withholding schedule.
“Accept all ≥ 90%” clears high-confidence detections in bulk; lower-confidence ones stay for hand review, and anything it accepts can still be reverted individually.
Bulk review
For large requests, the “Bulk review” page applies one redaction decision across many documents at once — highest-reach detections first. Open it with “Bulk Review” from the case’s Documents tab. A scope chip shows what you are reviewing, and a case-wide meter tracks how many detections are cleared and how many are left. The page works in three numbered steps:
- “Auto-accept high-confidence detections” (Lead / Senior Reviewer) — set the “Confidence threshold” slider and watch three tiles preview the effect live: “auto-accept above {X}%”, “held for manual review”, and “documents affected”. Press “Show the {N} detections this will redact” to inspect the literal result before committing with “Auto-accept {N} above {X}%”. Each accepted detection keeps its own suggested ground.
- “Auto-clear structured PII (emails, phone numbers, IDs)” (Senior Reviewer and above) — one chip per structured identifier type with a live count, such as “Redact all phone numbers”, “Redact all email addresses”, and “Redact all IRD numbers”. One press decides every pending detection of that type case-wide. The sweep is deliberately fenced to structured PII — as the page puts it, “Names, commercial information and legal grounds aren’t offered here” — and the fence is enforced server-side.
- “Review by reach” (open to every case participant to work through; “Hide everywhere” is a disclosure decision and needs Senior Reviewer or above) — Veil groups repeated values into entity groups, most-repeated first, each showing how many times it appears and across how many documents. Three moves per card: “Hide everywhere” (accept the group case-wide under its ground), “Look first” (open the first affected document), or “Not sensitive” (reject the group). After any batch action a banner offers “Review these {N}” and “Undo this batch”; when nothing is left to decide, “Continue to sign-off” unlocks.
Review workflow setup & assignment
The Lead configures who works each stage on “Review Workflow Setup”. Drag people from the “Reviewers” and “Approvers” palettes — and from the regime-aware Leads palette — onto the stages “Collect”, “First-Pass Review”, “Second-Pass Review”, and “Final Sign-off”, then press “Save Workflow”. The “Currently with:” / “Awaiting sign-off:” strip shows live progress.
Sign-off, senior review & final approval
When every detection on a document is decided, the assigned reviewer presses “Sign Off” and confirms with “Submit” — the document becomes “Reviewed (Initial)”. A senior reviewer or approver can press “Request Changes” → “Send Back” to return it to “In Review” with an optional reason. A Senior Reviewer cannot give final sign-off — that separation of duties is deliberate.
Senior endorsement (per case). On a case where the Lead has turned on “Require senior endorsement before final sign-off” (Details tab; it needs a second-pass review stage and locks once used), a reviewed document must first be endorsed by a senior — “Endorse” → “Confirm Endorsement” — reaching the “Endorsed” state before final sign-off; attempting to sign off earlier is refused with “Cannot sign off: this case requires senior endorsement — the document must be endorsed before final sign-off.” Any detection change voids an endorsement and regresses the document, so an endorsement never attests content the endorser did not see.
A Final Approver (or the Lead) presses “Final Approval” → “Confirm Approval”: the document becomes “Signed Off” and its detections are locked — any edit is refused with “This document is signed off — use Send back to re-open it for changes.” The lock holds while the document stays signed off, and it is reversible by design: a Senior Reviewer, Final Approver or Lead can press “Send back” on “Finalise & Close” (“Send this signed-off document back for re-redaction (resets the attestation round)”), returning that document — and only it — to “In Review”, unlocked; the case attestation round resets and the document must pass sign-off again. Only release is terminal. At the case level, on “Finalise & Close”, the assigned approver completes the “Final sign-off” panel: choose the “Disclosure outcome” (“Granted in full”, “Granted in part”, or “Refused”) and press “Attest case complete”.
Version comparison
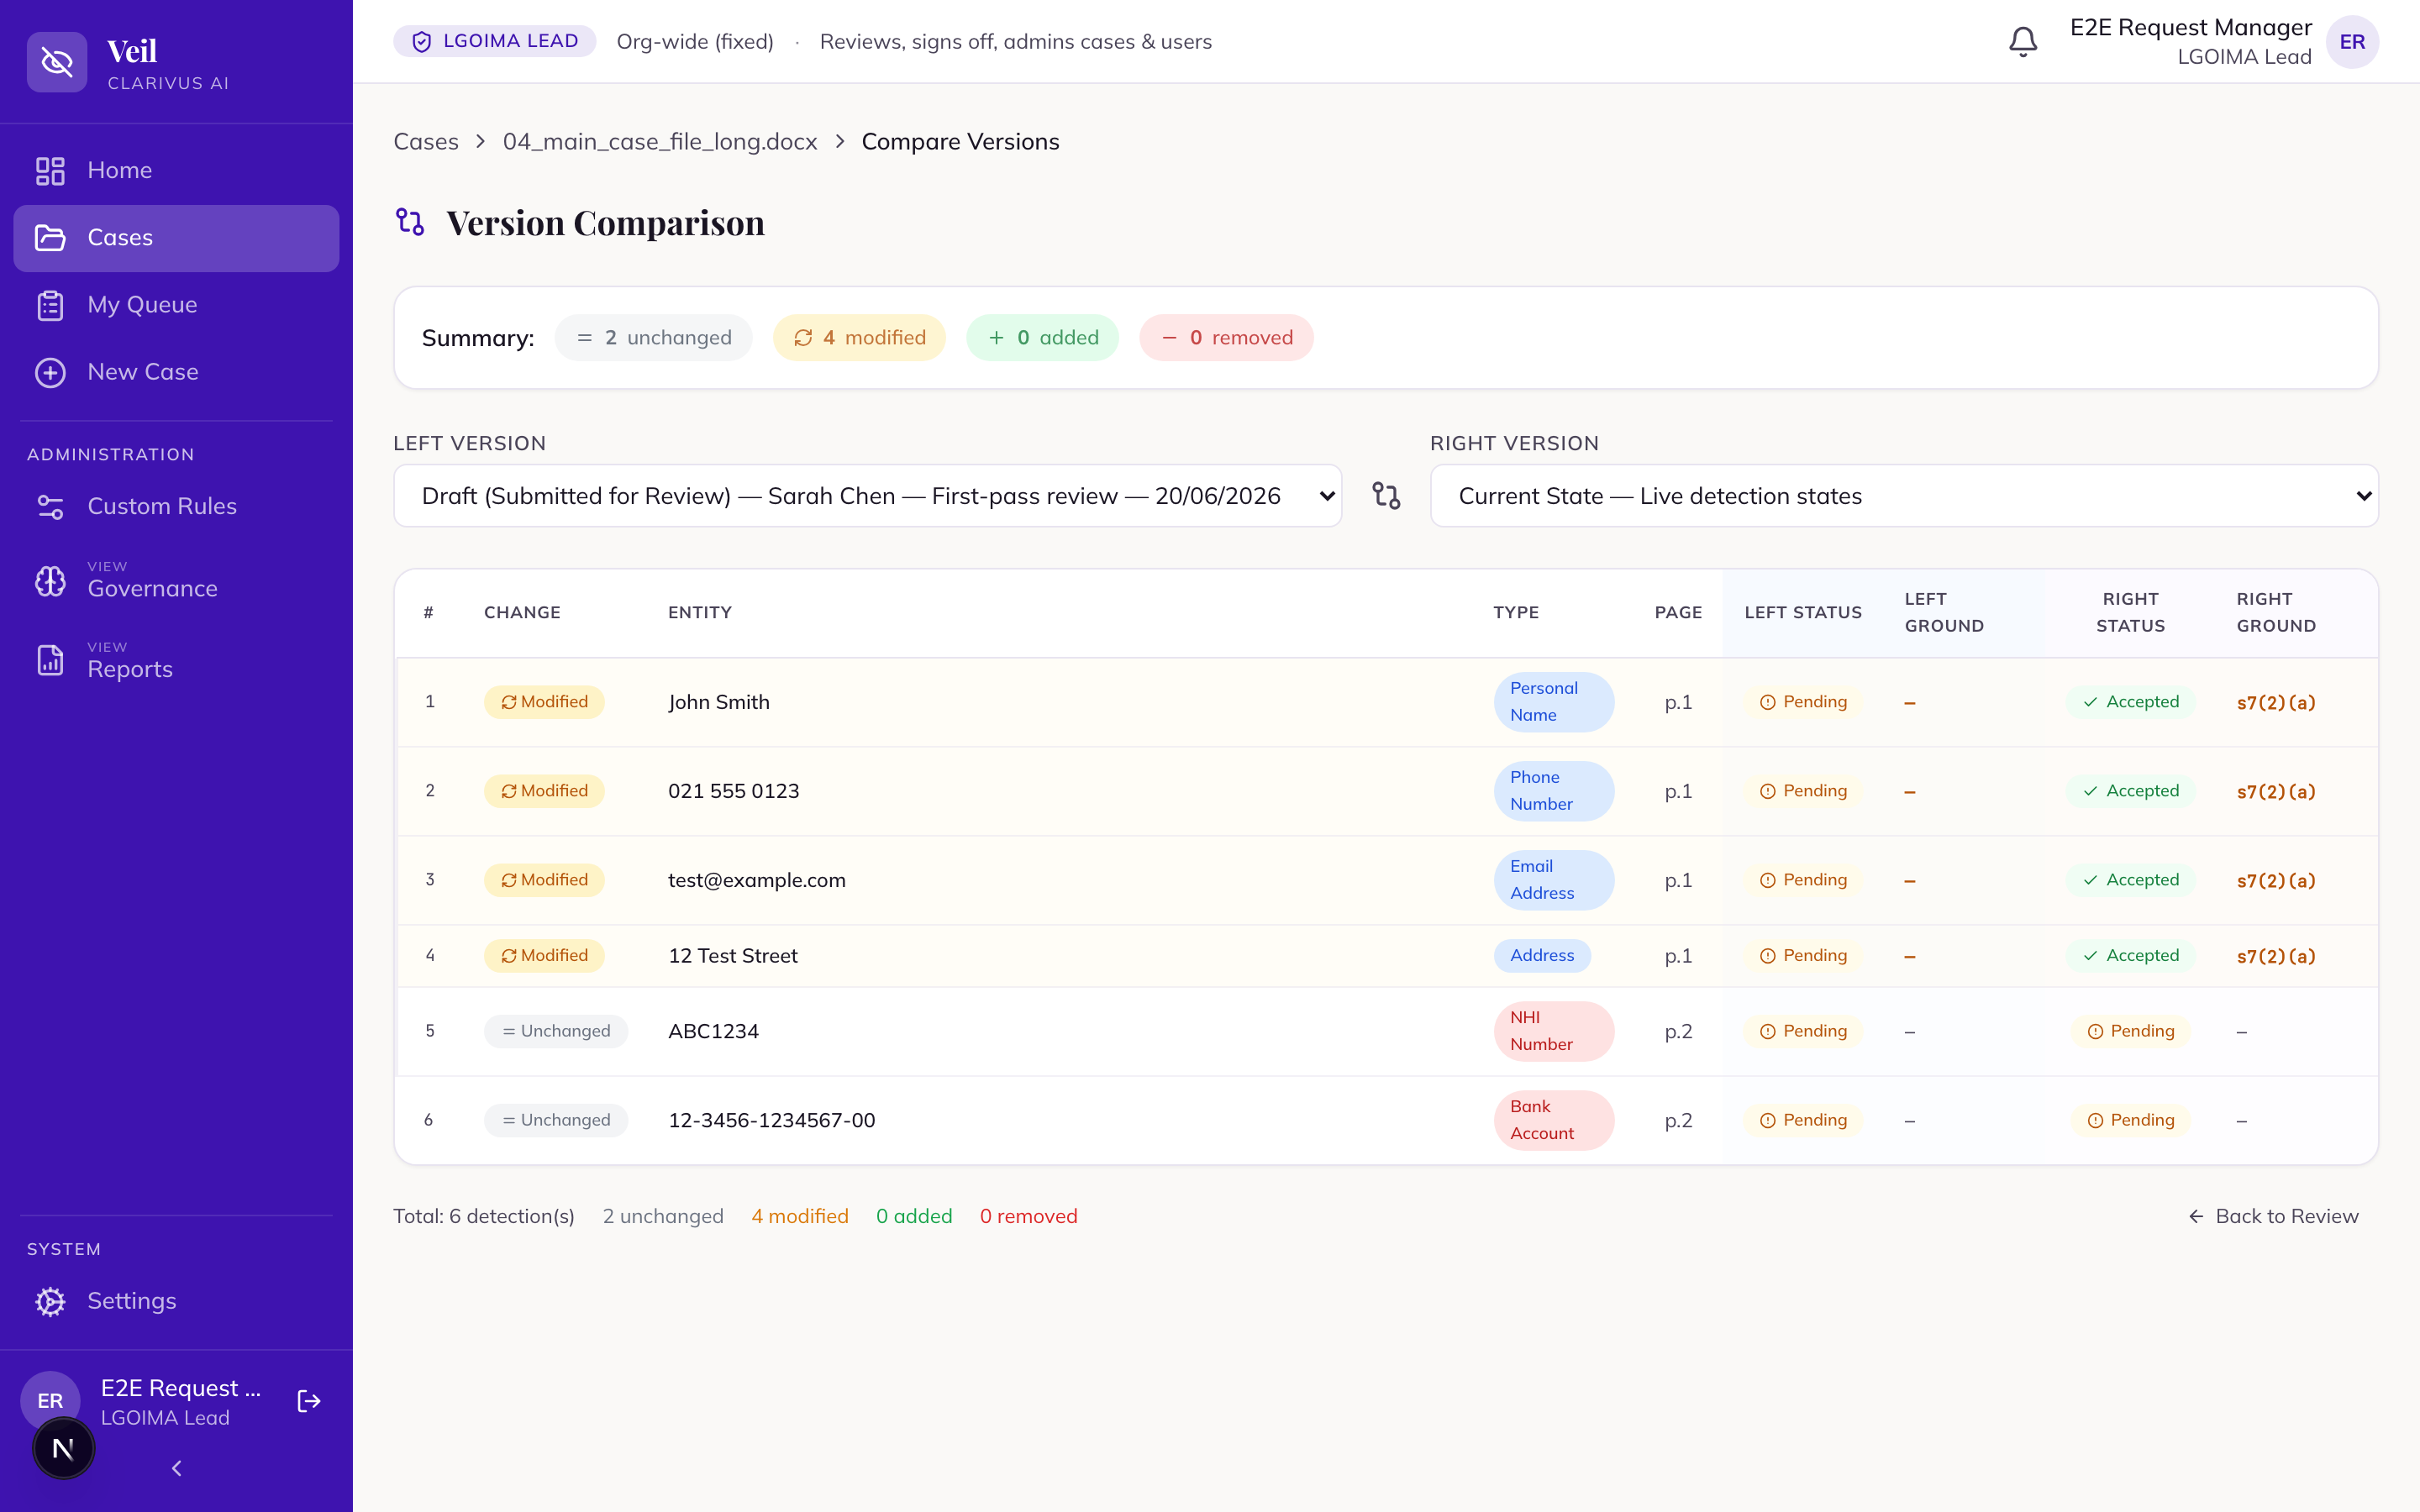
Veil snapshots a document’s redaction decisions at each milestone, so you can see exactly what changed — ideal for checking a document that has come back after a send-back. Open “Compare versions” from the ⋯ (More) menu on the review toolbar — the item appears once the document has reached “Reviewed (Initial)” (or later); during first-pass review it is absent, because no snapshot exists yet. Choose a “Left Version” and “Right Version” — any snapshot or “Current State”. Snapshots are labelled “Draft (Submitted for Review)” and “Final (Signed Off)”.
Each detection is marked “Added”, “Removed”, “Modified”, or “Unchanged”, with “Left Ground” / “Right Ground” columns so a changed statutory ground stands out. The “Summary:” pills filter the table.
Export packages & release
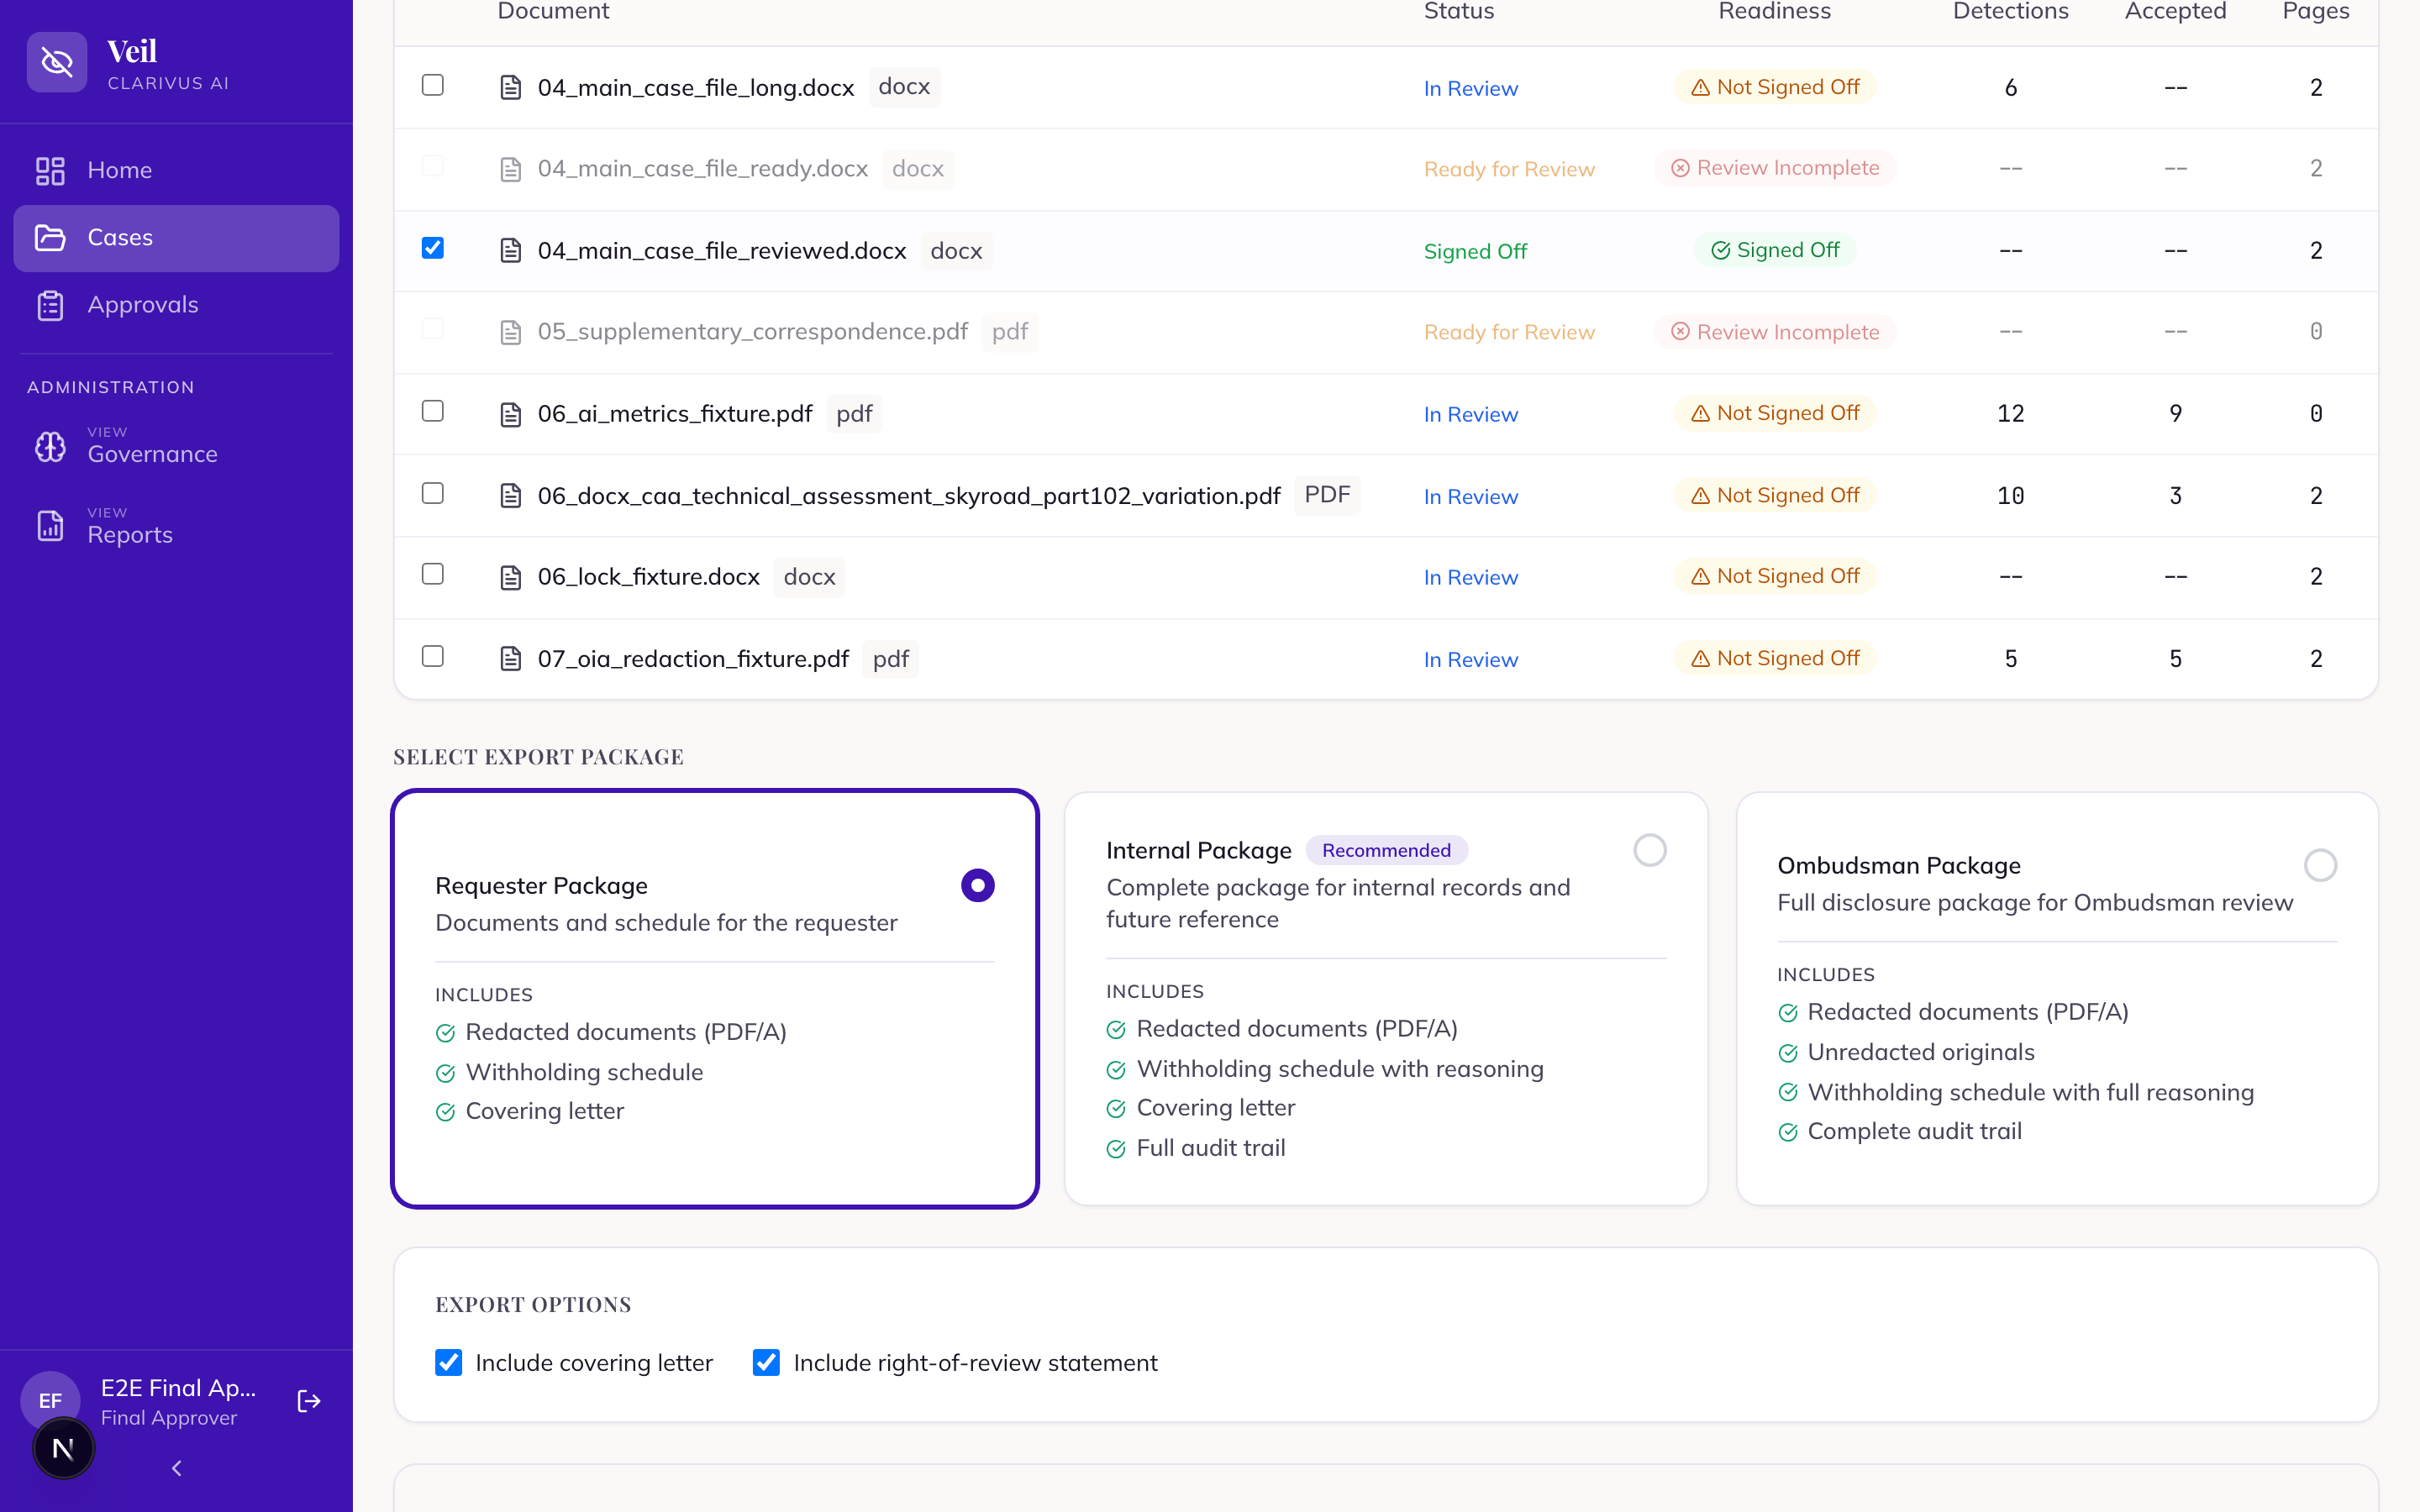
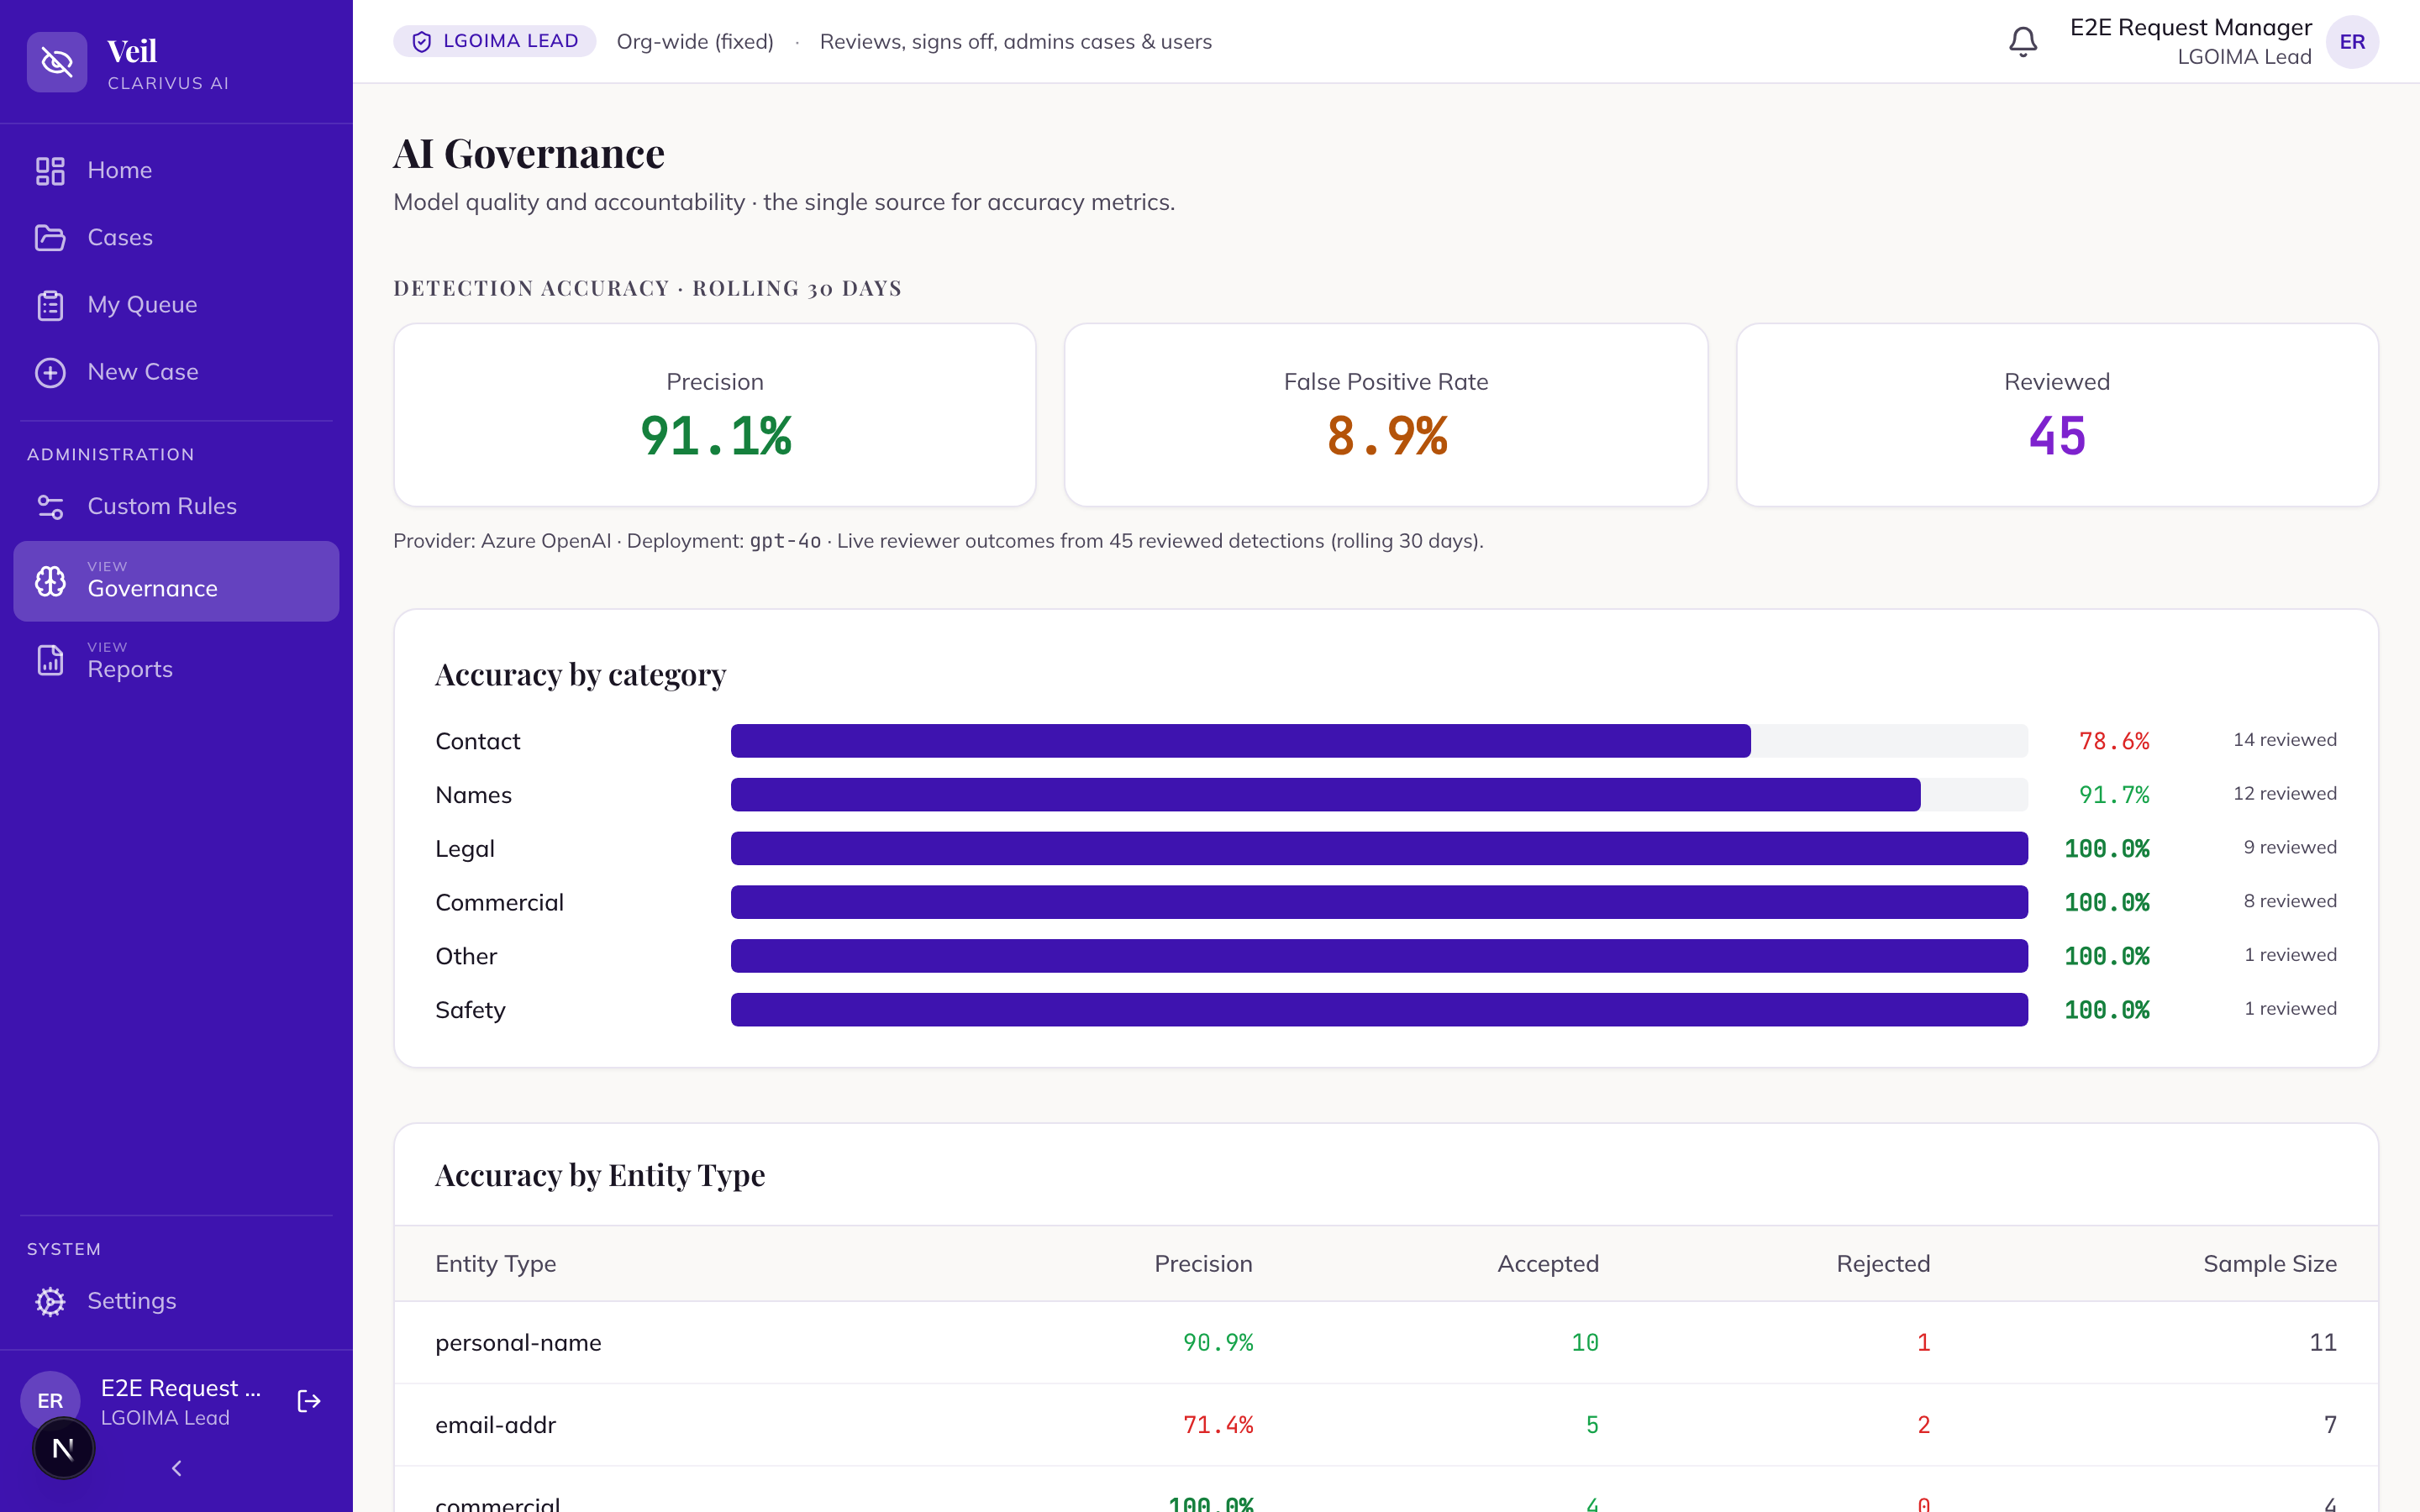
Export lives on “Finalise & Close”. Check “Document Readiness” — only “Signed off — ready to export” documents export cleanly — then choose the documents and one of three packages: “Requester Package” (the only package screened for external release: it omits withheld text and reviewer reasoning and anonymises filenames), “Internal Package” (marked “Recommended”, for your own records — adds the audit trail and verification report), or “Ombudsman Package” (the full disclosure file, including the unredacted originals — never send it to a requester).
Press “Generate Export Package”. Veil burns in the redactions and verifies they are permanent — you’ll see “Verifying redactions are permanent...” — then offers “Download Package” with a SHA-256 integrity hash. Generating an external package requires the case to be fully attested and your agency name to be set.
Once attested, the Lead presses “Mark as released” under “Release for disclosure”. This freezes the case and all its documents and stamps the disclosure date — release is terminal and irreversible. The case then reads “Released for disclosure”; finally, “Close & archive” the case (the Lead can “Reopen case” later if needed).

Custom detection rules
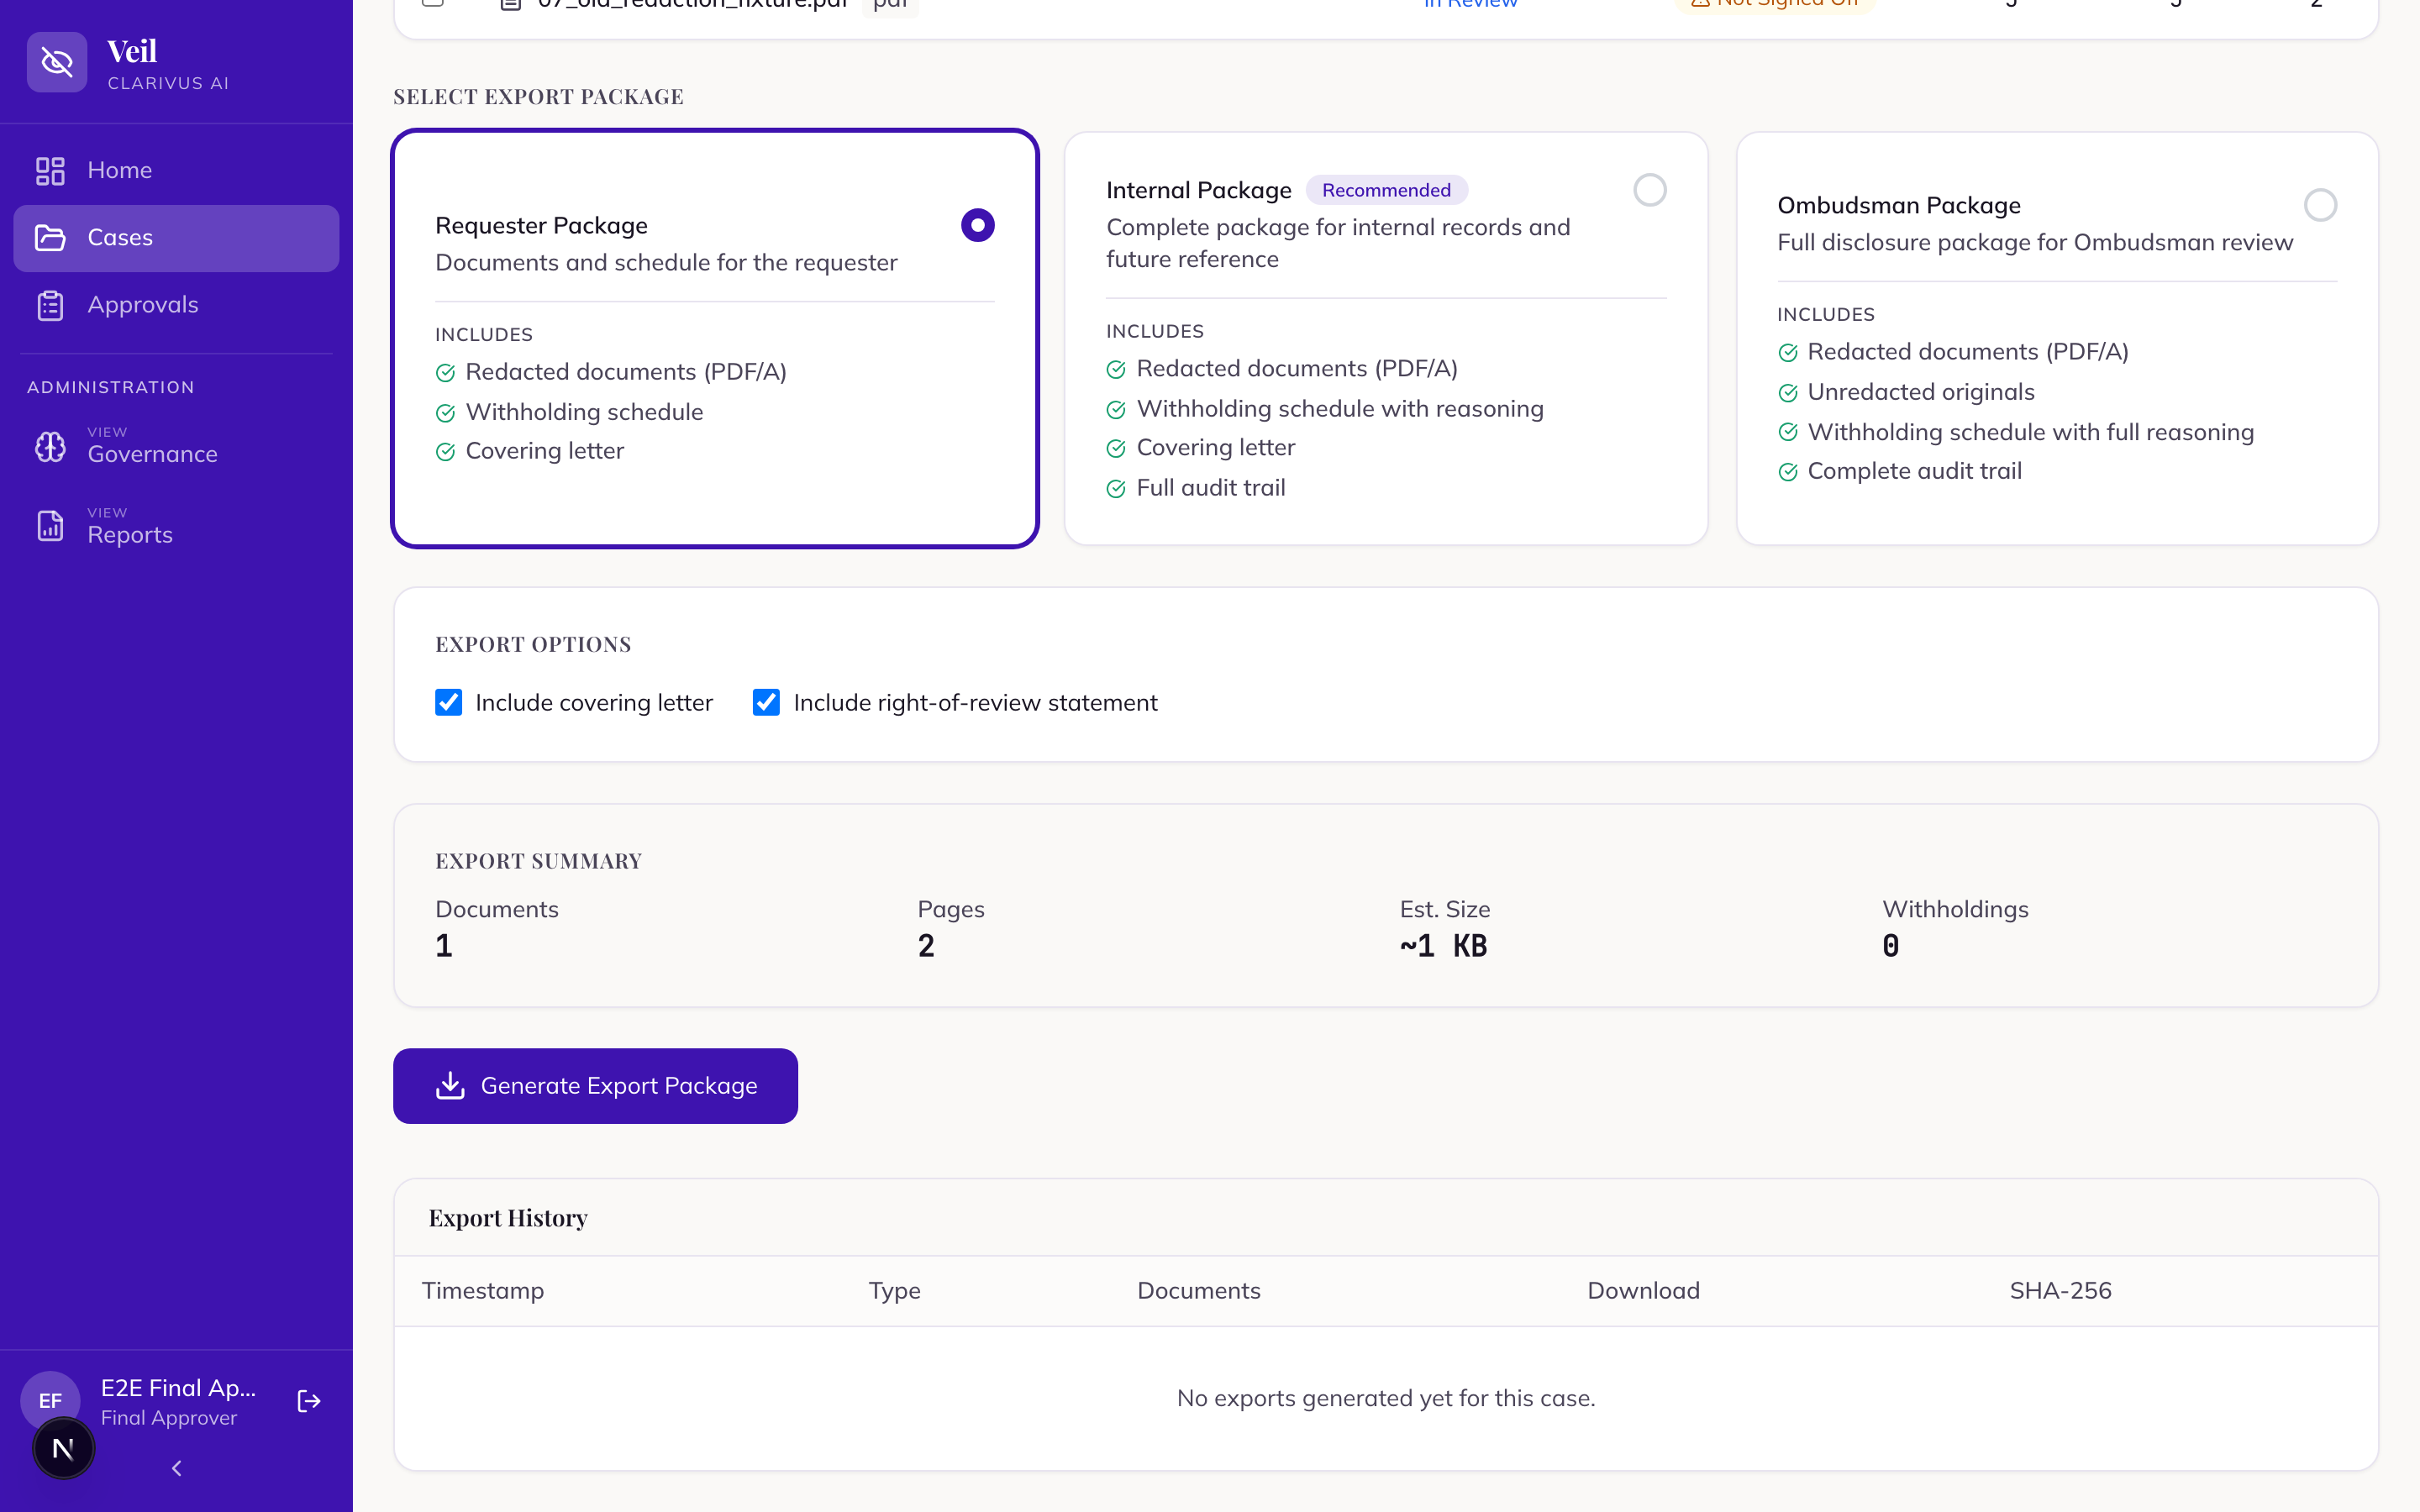
“Custom Rules” teaches Veil agency-specific things to look for — “Agency-specific detection rules that run alongside the AI — keywords, patterns and entities mapped to withholding grounds.” The screen is shared between the Lead and the Senior Reviewer. “New rule” opens the editor: “Rule name”, “Type” (Keyword / Pattern / Entity / Combination), “Match mode” (Exact / Fuzzy / Regex), “Keywords / pattern”, “Withholding ground”, “Priority”, and “Description”.
Save with “Save as Draft” or “Save & Activate”; the per-row switch flips a rule between Active and Draft, and only Active rules run (“Drafts are saved but never match documents”). “Import” / “Export” move whole rule sets as JSON, and the stat strip tracks “active rules”, “drafts — not yet running”, “matches”, and “grounds covered”.
Schedule & audit trail tabs; Reports; AI Governance
Two case tabs show the live disclosure record without generating a PDF. “Withholding Schedule” (the Schedule tab) lists every withheld item grouped by ground, with an editable “Covering Statement”, the “Right of Review (Standard Text)”, and a “Preview as PDF” button. “Audit Trail” (the Audit tab) is the “Immutable audit log” — “entries cannot be modified or deleted” — recording every action with its user, role, target, and timestamp, searchable and filterable, with “Export CSV” and “Export PDF”.
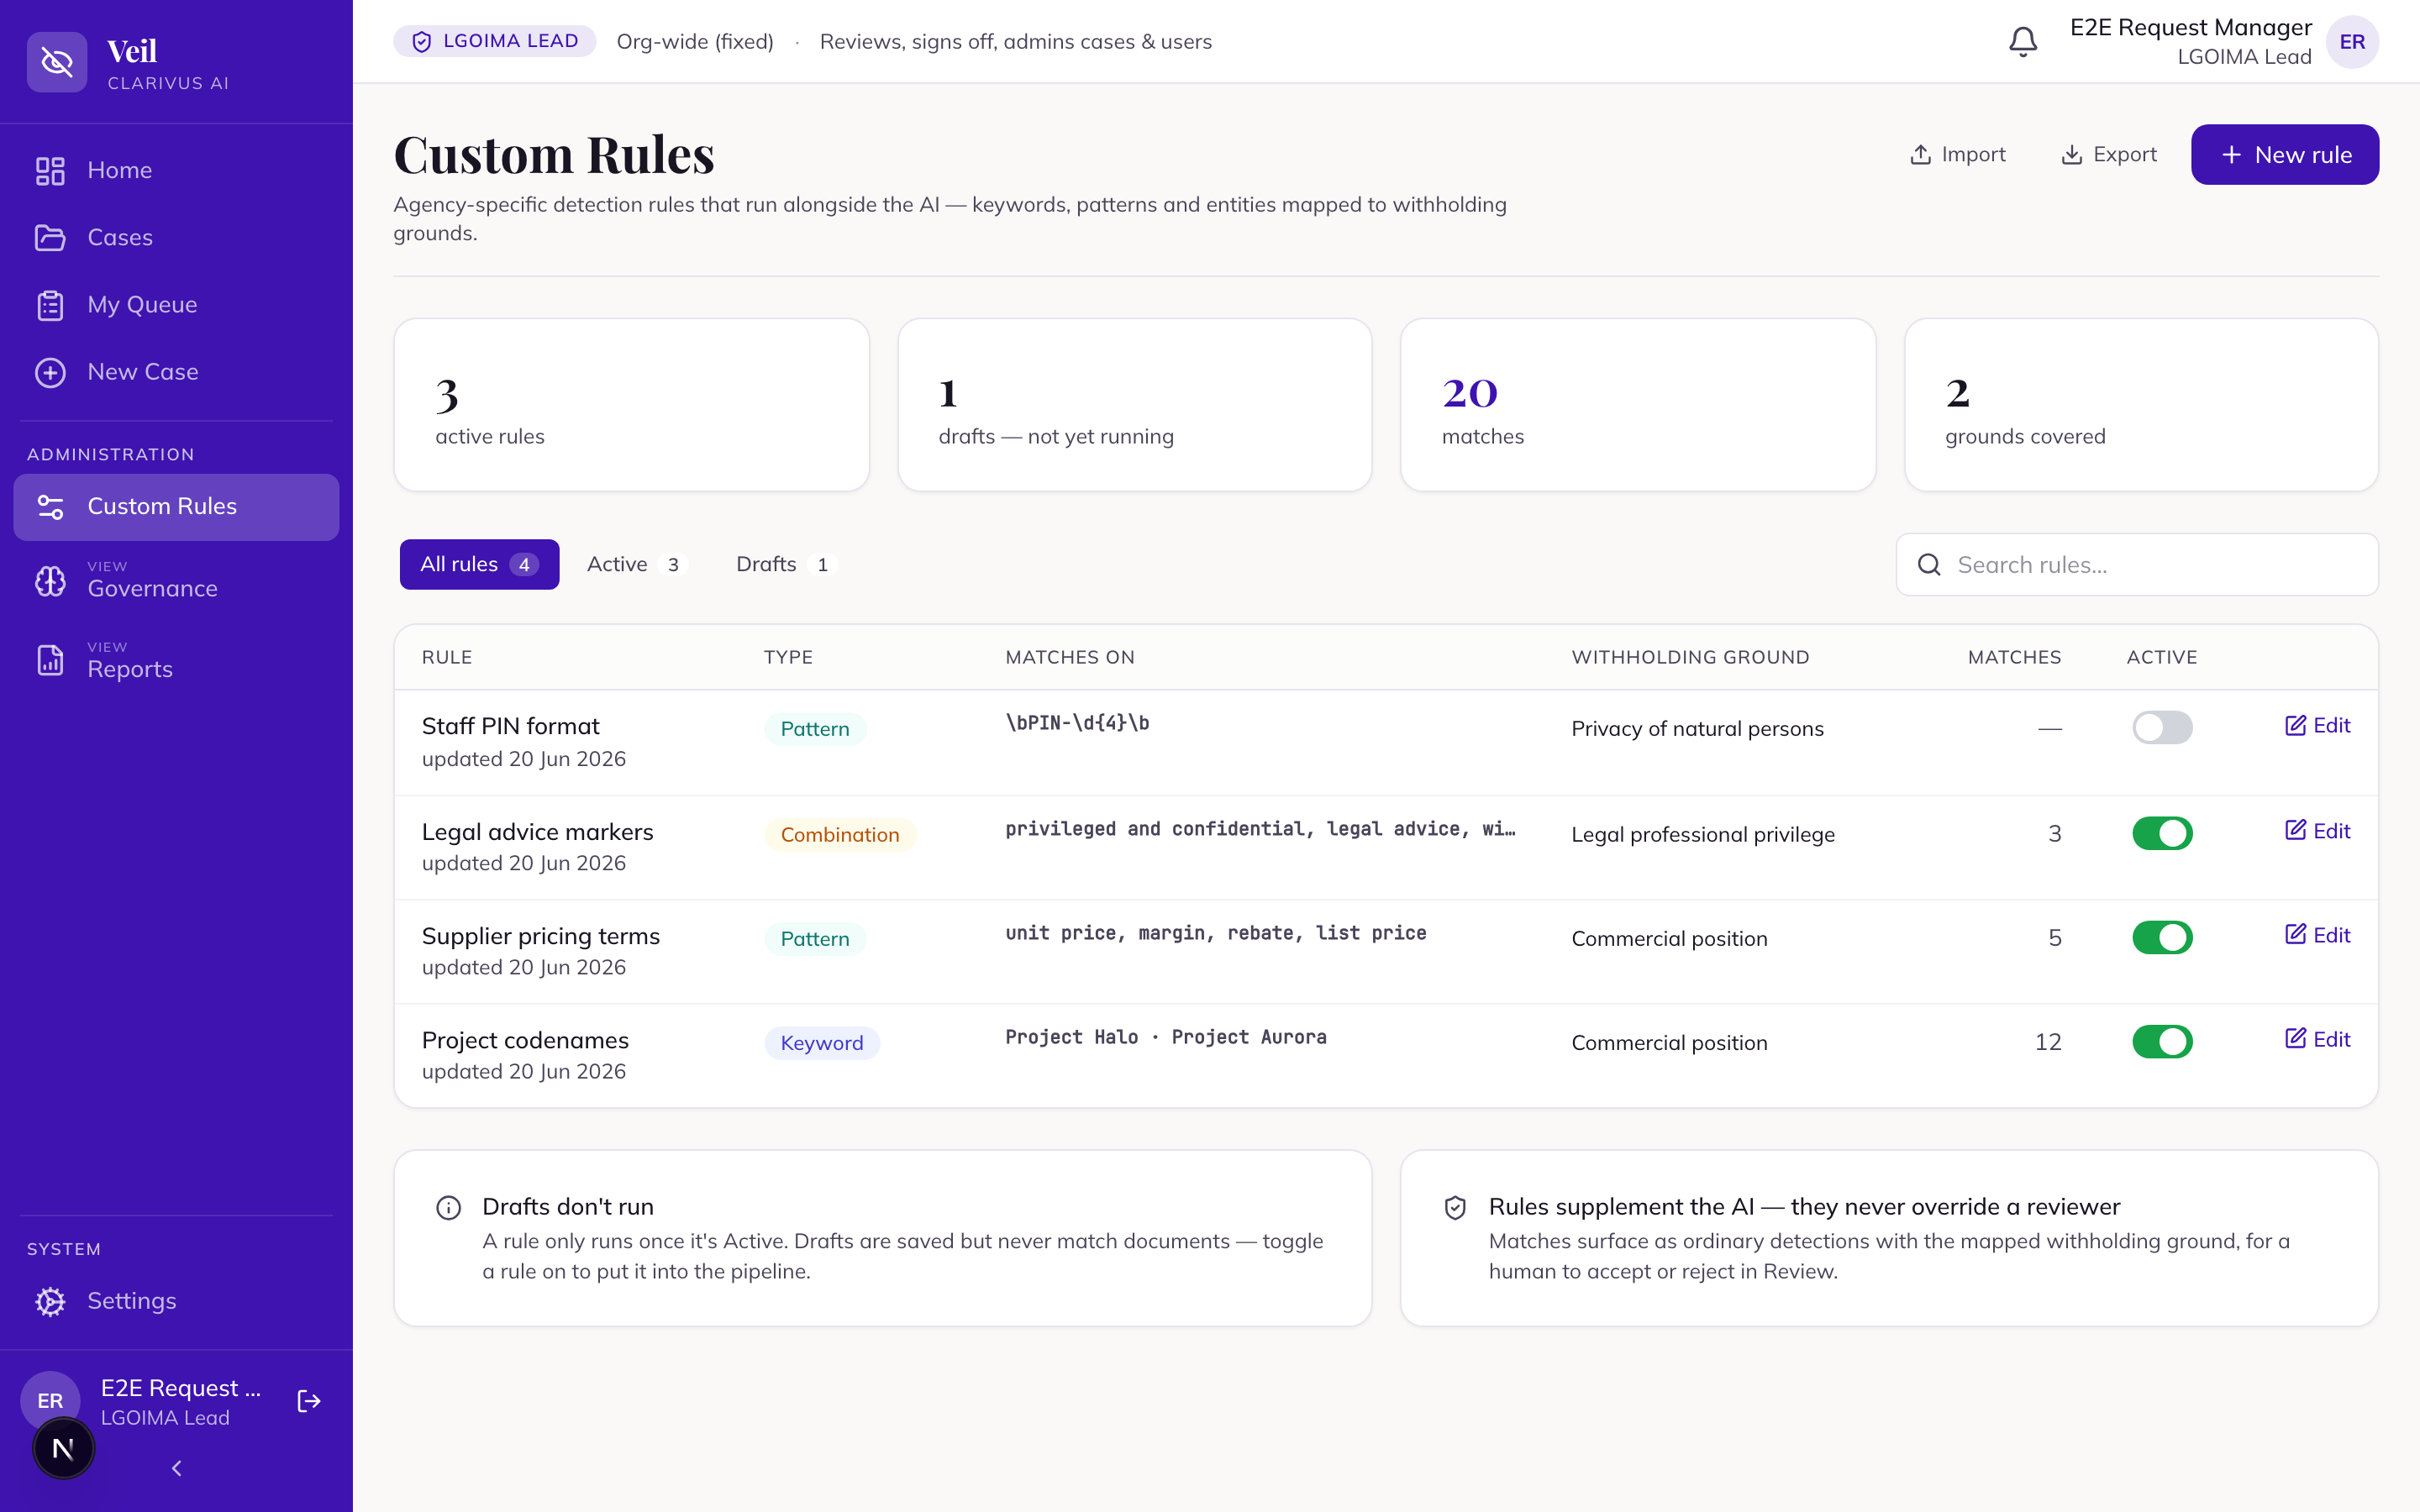
The “Reports” screen produces statutory reports and disclosure analytics (case roles only — not available to the Administrator): the regime’s Compliance Summary, “Withholding Schedule”, “Chain of Custody”, and “Cost Recovery”, with a “Reporting period” selector for the analytics.
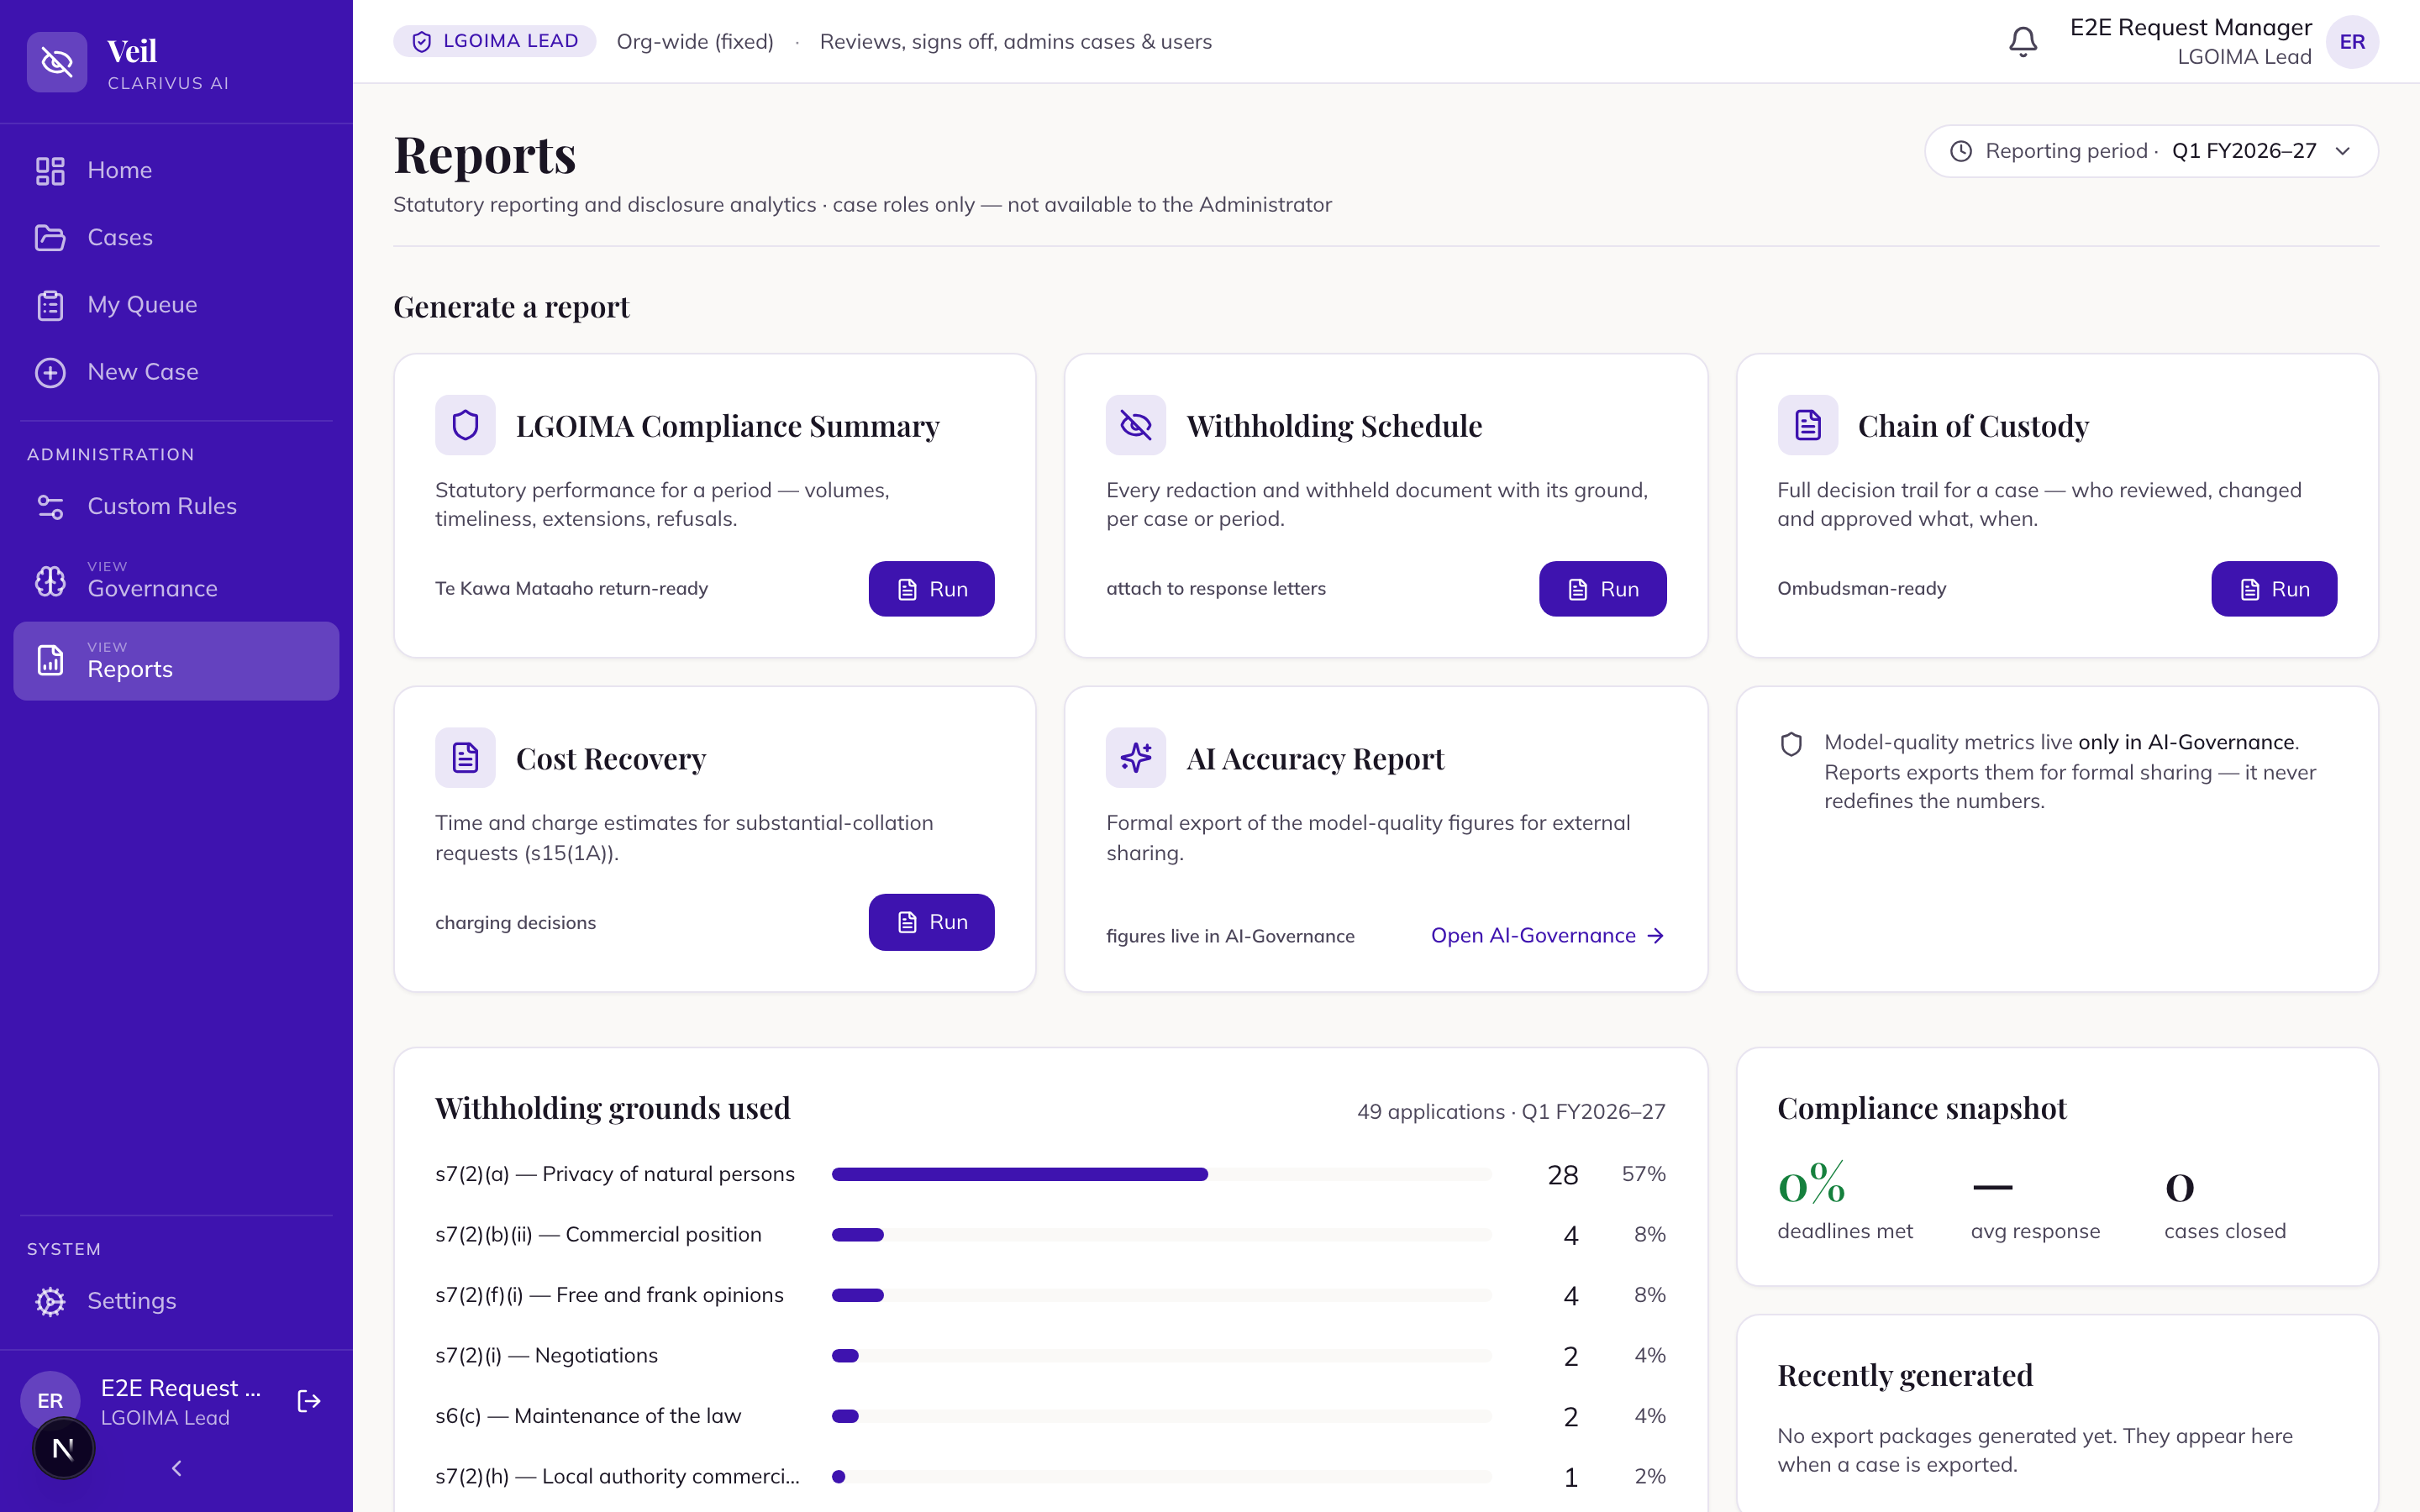
“AI Governance” is the single source for accuracy metrics (any case role; not the Administrator): “Detection accuracy · Rolling 30 days” with “Precision”, “False Positive Rate”, and “Reviewed” counts; “Human overrides”; “AI Miss Analysis (False Negatives)”; and “Processing performance” with “Model Information”. Until 10 AI detections have been reviewed the page shows “Insufficient Review Data” with a progress counter.
Pre-release QA
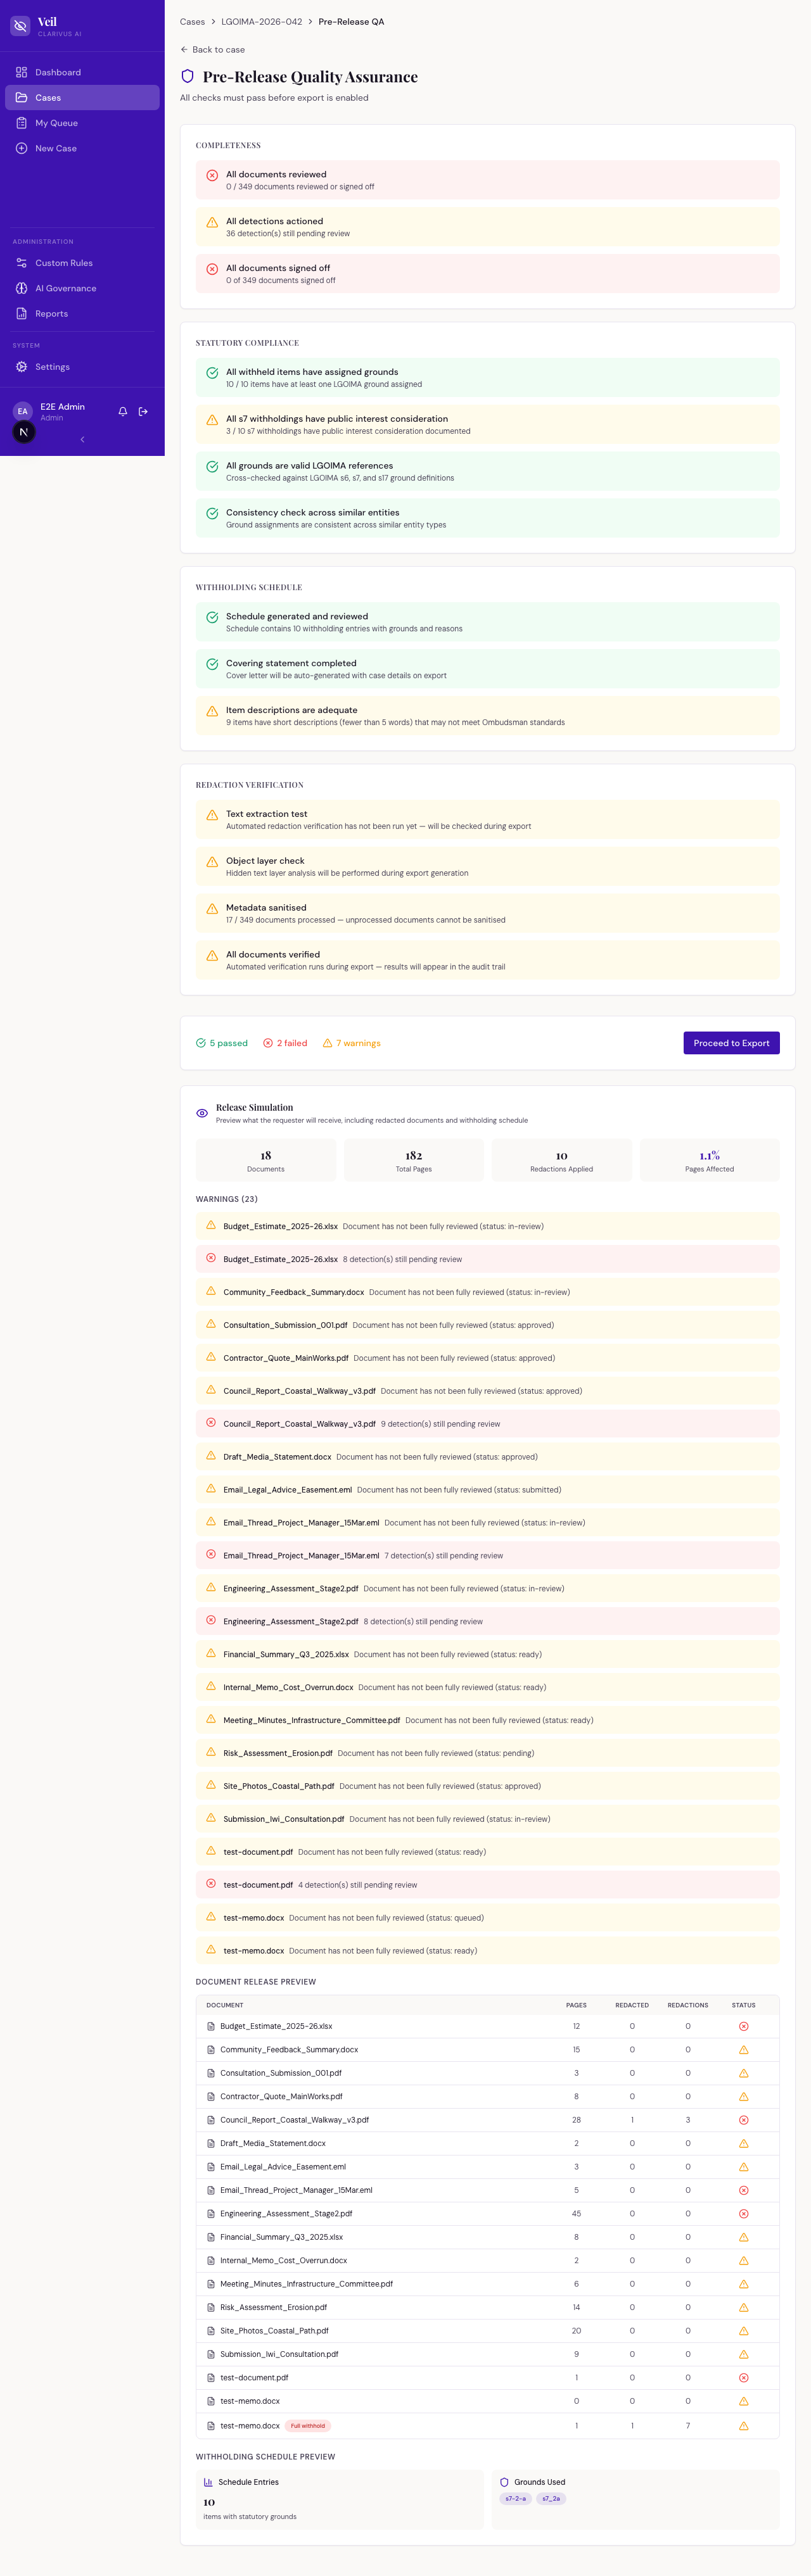
Between final approval and export, a case can pass through a “QA” status — a pre-release quality-assurance check that the case is genuinely ready to go out. The readiness badges on “Finalise & Close” show exactly what still blocks a clean export: “Signed Off”, “Not Signed Off”, “Missing Grounds”, or “Review Incomplete”. The export itself then runs the redaction-permanence verification described above — the final, authoritative check before anything leaves the building.
Microsoft 365 / SharePoint
SharePoint integration is a conditional feature — it appears only when your instance is connected to Microsoft 365. If you don’t see it, your organisation hasn’t enabled it; use direct upload instead.
The “Import from SharePoint” tab appears on “Document Ingestion” and is enabled when your instance is connected. On the current release the connected tab shows “SharePoint import — coming soon”: in-app library browsing and selection is on the roadmap, so for now download the files from SharePoint and upload them directly — they join the same “Processing Queue” and run the same pipeline.
Sending an export package back to SharePoint is coming soon — it is not yet available on the current release; download the package instead. One rule is permanent by design: the Ombudsman package can never go to SharePoint, because it contains the unredacted originals.